
The flex shaft may be the single most used and versatile tool in my workshop. It can be used while working with plastic, glass, metal, stone, wood or wax. With this tool, I can grind, sand, polish, drill, hammer, carve, saw and more. The flex shaft system consists of 4 basic parts: the motor, the flexible shaft, the hand piece and the speed control. There are different types of motors, hand pieces and speed controls; some for general use, some for more specialized applications. The system you choose will depend on what you want to do with it. I’m going to focus on the Foredom SR as this is what I have in my workshop, but there are several different brands out there that do the same job.
Motor
One of the most common motors used by jewellers has about 1/6 HP and runs in forward and reverse up to speeds of 18000 RPM. This motor runs on standard household voltage of 115V. The motor is basically a sealed unit, and it requires very little in the way of maintenance.
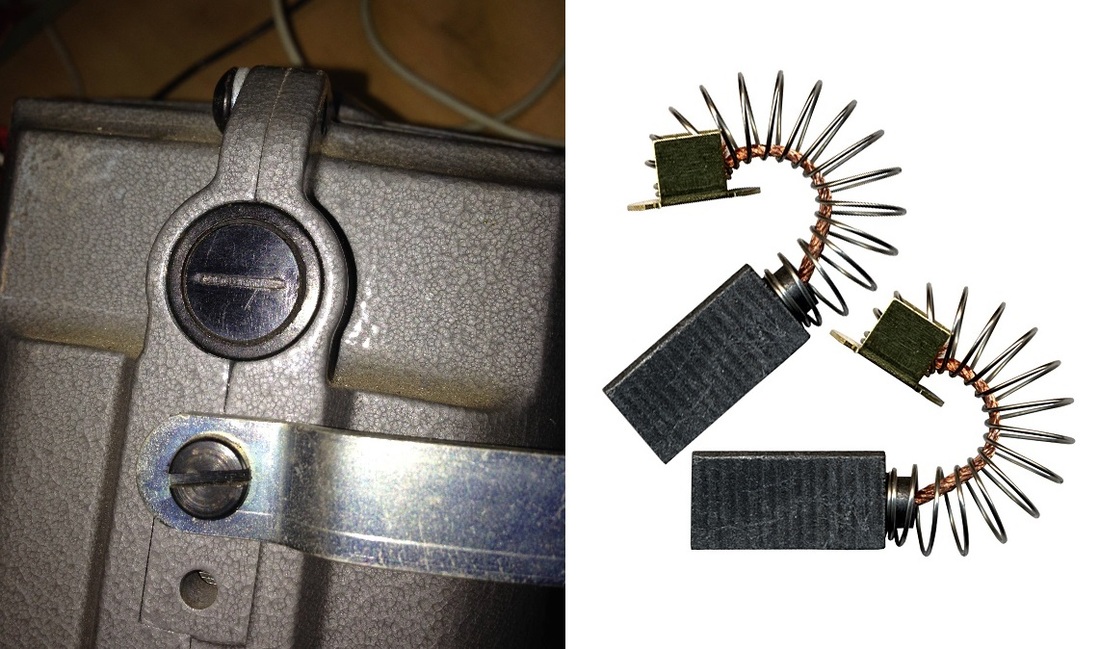
It has 2 carbon block brushes that should be checked at regular intervals, I usually do this every 100 hours of use. There are two screw plugs, one on each side of the motor. Remove these and the brushes are right there. The brushes are about 19 mm (¾”) long when new, and they should be replaced when they are worn down to 7 mm (¼)”. You should also check to see if there are any unusual wear patterns in the brush, and that it is wearing evenly.
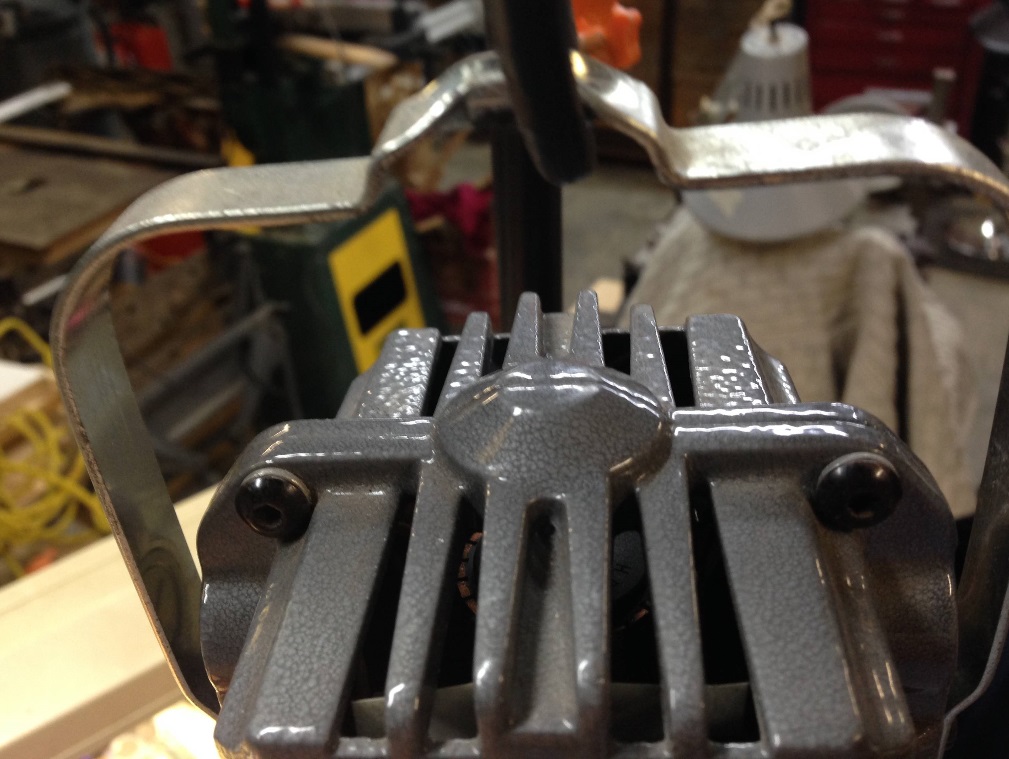
A little blast of canned air in the vents will remove any dust or debris that could work its way into the motor housing. This should be done every 40-50 hours and I usually synchronize this task with the shaft maintenance.
Flexible Shaft
The flexible shaft is exactly what it sounds like. It is a shaft driven by the motor which in turn drives the handpiece, allowing you to perform all these wonderful functions. Oh yes, and it’s flexible. Be careful though! Bending the shaft too sharply, looping it, or bending it near the attach point at the motor or hand piece can damage it. Make sure you keep the shaft loose with wide bends in order to keep it operating in the best possible condition.
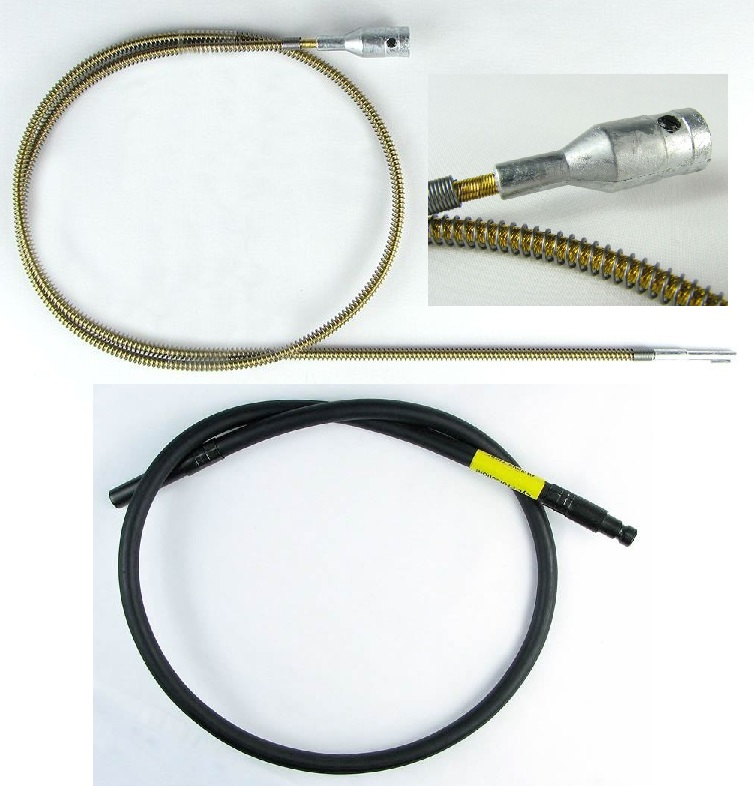
The shaft consists of two parts; a rubber outer sheath which protects the inner shaft.. The shaft does require regular maintenance to keep everything running in optimum condition.
The shaft should be regreased every 40-50 hours of use. If you don’t have flex shaft grease, use a high quality white lubricating grease. Here’s a step by step for regreasing the shaft:

Safety first! Unplug! The last thing you want is for things to start spinning at high speeds with your fingers in the way. By the same token, long hair should be pulled back, loose clothing should be tucked and the general area should be clean and clutter free. Gather all your materials and tools, I hate being in the middle of a task and then realizing that I have to drop everything and run to get something else.
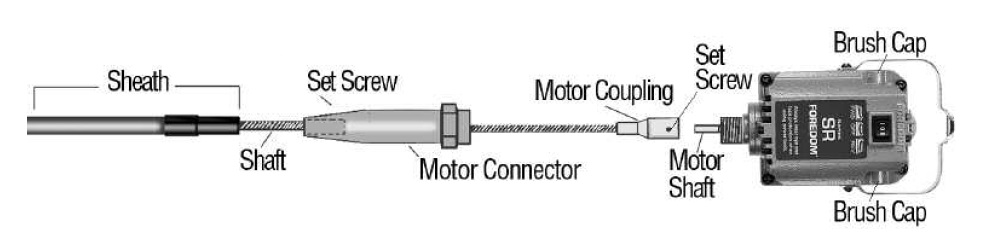
Remove the hand piece, it just pulls off. Loosen or remove the set screw at the top of the shaft on the motor connector.. Slide the sheath off the shaft and inspect the sheath thoroughly; if it is worn or damaged it should be replaced. Inspect the shaft and spring for damage.
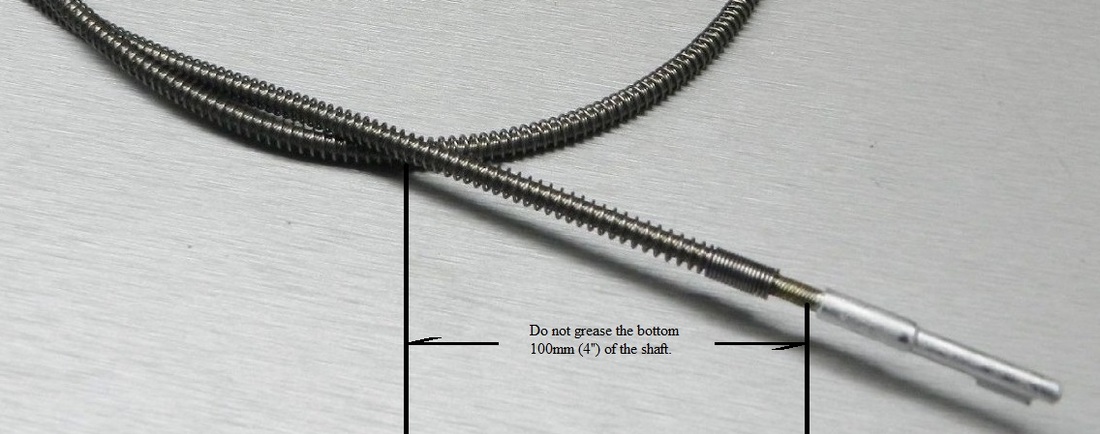
Apply a light coat of grease, leaving the bottom 100 mm (4”) bare. This will prevent any excess grease from getting into the hand piece.
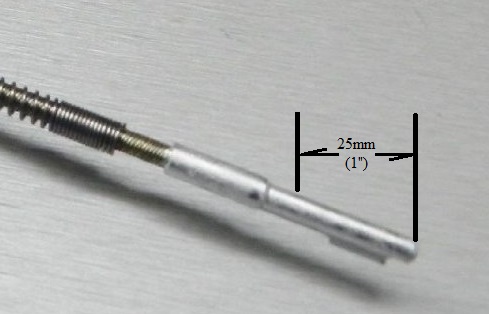
Slide the sheath back on, leaving 19-25 mm (¾-1”) of the shaft key showing. Tighten the set screw at the top of the shaft.
Hang the shaft up and plug it in. Let the shaft hang straight down and have the tip dangling in an empty pail or garbage can. Run the motor at high speed for about 10 minutes.This will distribute the grease evenly on the shaft and let any excess grease drip out. (Hence the pail, to catch the drippings!) Wipe any grease off the shaft key.
Hand Pieces
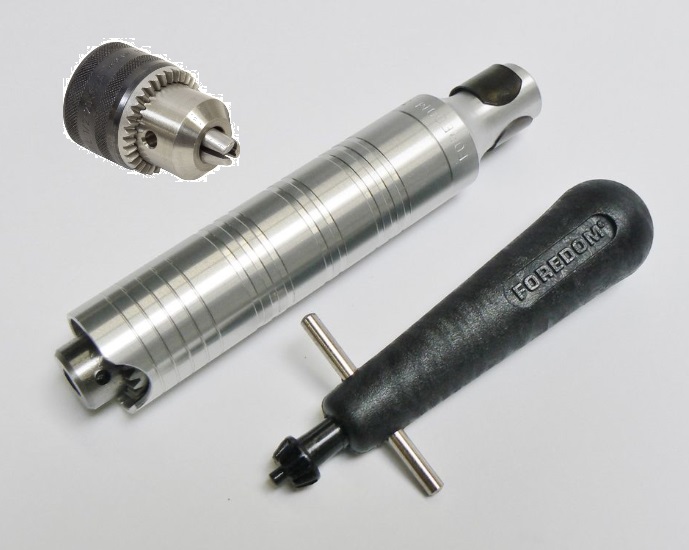
There are several different types of hand pieces, many of them for specialized use. The most popular are the #30 hand piece and the #20 quick change hand piece.
The #30 is a general purpose hand piece with a 3 jaw Jacob’s chuck that will accept any size shank up to 4 mm (5/32)”. This hand piece is basically maintenance free, requiring no lubrication
The #30 is a general purpose hand piece with a 3 jaw Jacob’s chuck that will accept any size shank up to 4 mm (5/32)”. This hand piece is basically maintenance free, requiring no lubrication
 #30 Hand Piece | 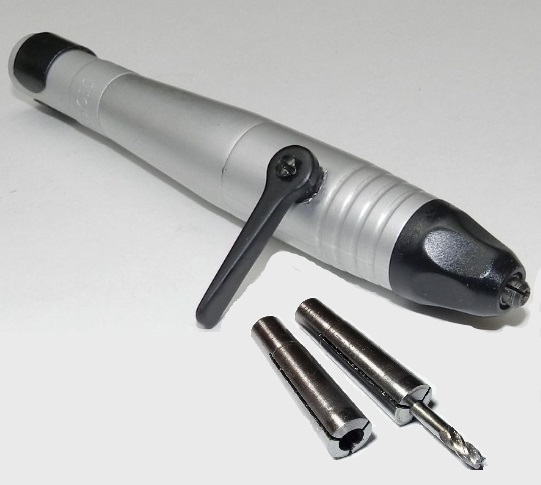 #20 Quick Change Hand Piece |
The #20 is also a general purpose hand piece which has a lever that allows accessories to be changed very quickly. The drawback is that this type of hand piece has a collet instead of a chuck and can only accept one size shank, in this case 2.35 mm (3/32”). The collet can be adjusted or changed if needed, otherwise this hand piece is also maintenance free.
Hand pieces are the most personalized thing about the system. Each style has something that may appeal to different people. There are specialized hand pieces for hammering, which is something a stone setter may wish to invest in; or for chiselling, which a carver would find useful. Again, do your research. What you will be doing with the flex shaft will determine what kind of options you need.
Speed Controls
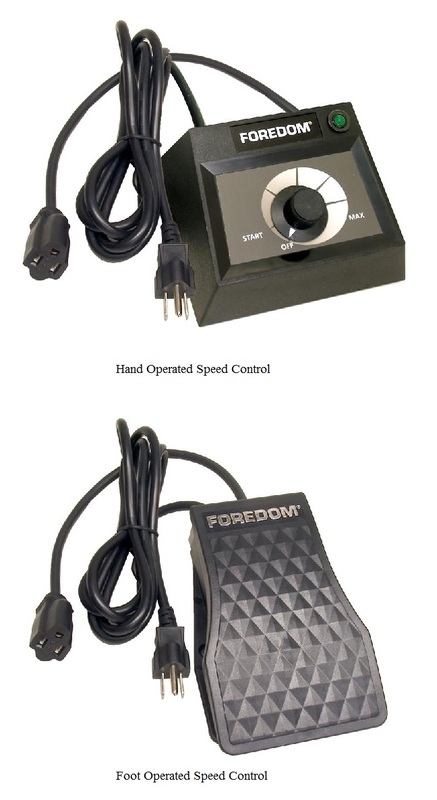
There are two basic types of speed controls, hand operated and foot operated.
Hand operated controls are mounted on the bench and allow you to set a speed. You can then return to that speed time and again by using an on/off switch.
Foot operated controls sit on the floor under the bench. They are a variable speed control, just like a gas pedal in a car, the harder you press it, the faster it goes.
Speed controls are also maintenance free, though I find that the foot operated control needs to be cleaned every now and again.
Motor Mounts

Flex shafts can be mounted on a bench top, but are more commonly hung up like a pendant. For the pendant style, you can buy ready made hangers for one or two motors, or there are many DIY projects that will work as well.
DIY Flex Shaft Hanger
| Materials 90 cm (3’) long section of 12 mm (½”) steel pipe, threaded at one end for at least 25 mm (1”) steel flange paint roller large washer, cotter pin, nuts and bolts | 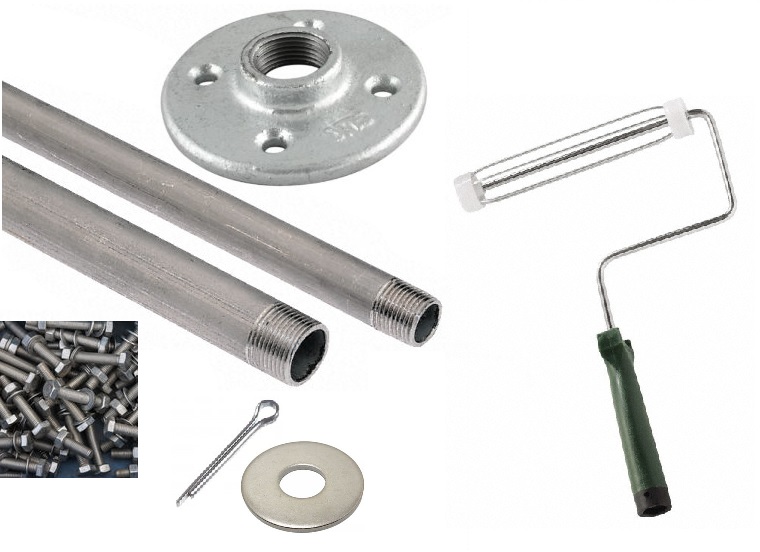 |
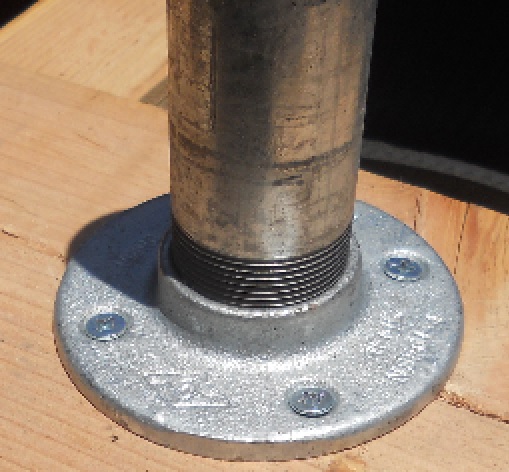
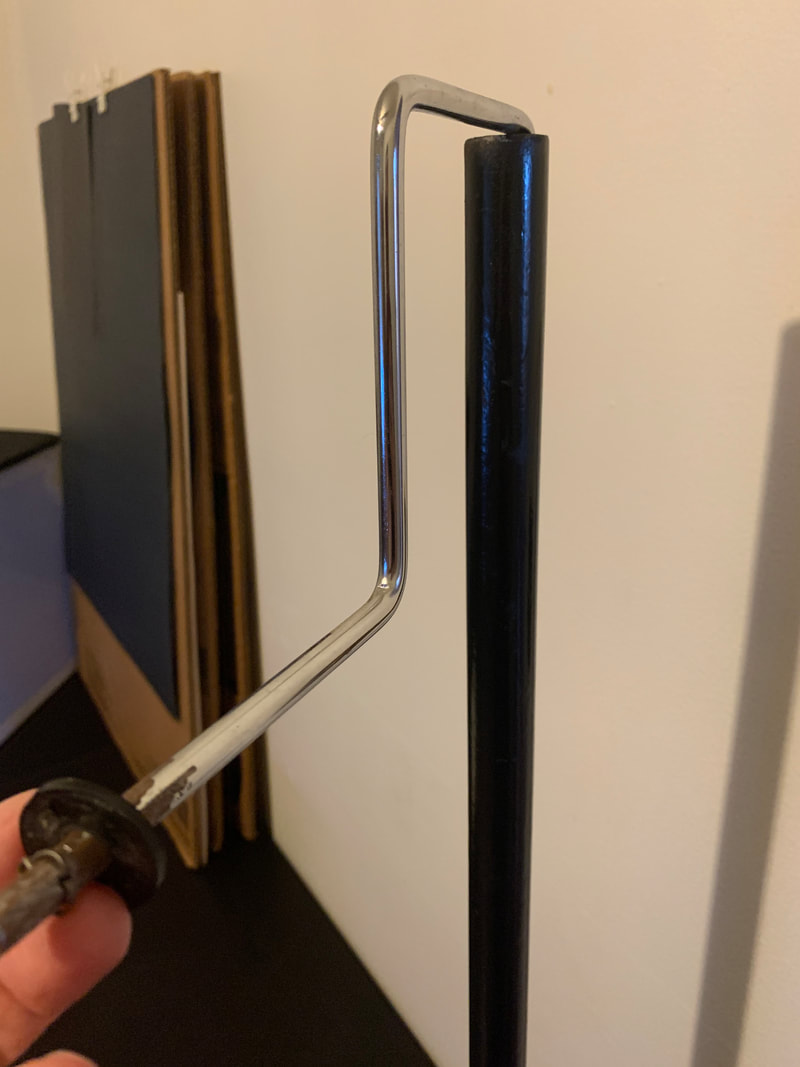
Thread the steel pipe into the flange and tighten as much as you are able. Paint the pipe and flange in the colour of your choice. Painting them after you’ve attached them together will also help prevent accidental loosening. Secure this apparatus to your bench using the correct size of nuts and bolts.
Remove the handle and the roller cage from the paint roller. This is the perfect shape to use as a hanger for the motor. One end goes in the pipe you secured to the bench, the other holds the motor. If the part of the rod where the motor will hang is too long, cut it as desired. Just make sure you leave enough room so that the motor can hang without being jammed up against the pipe.
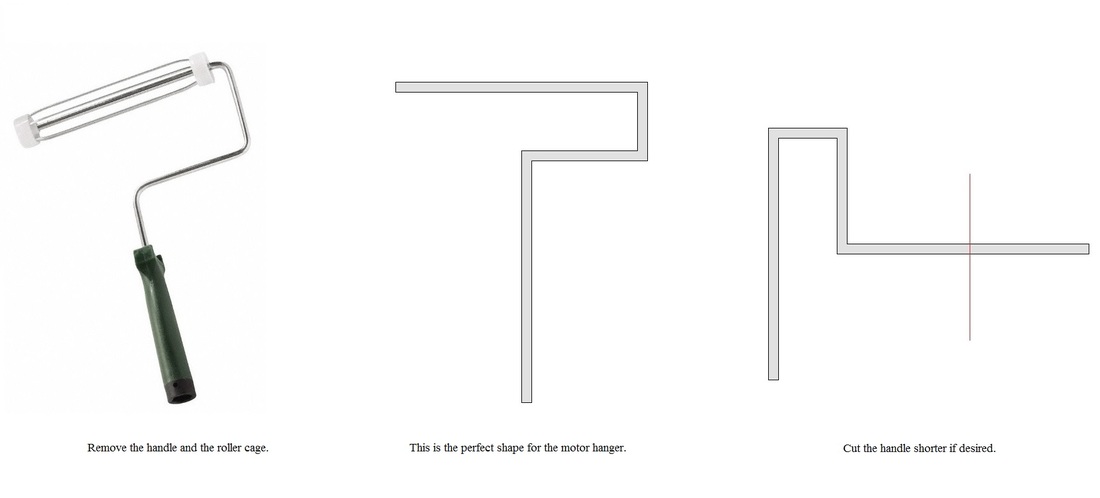
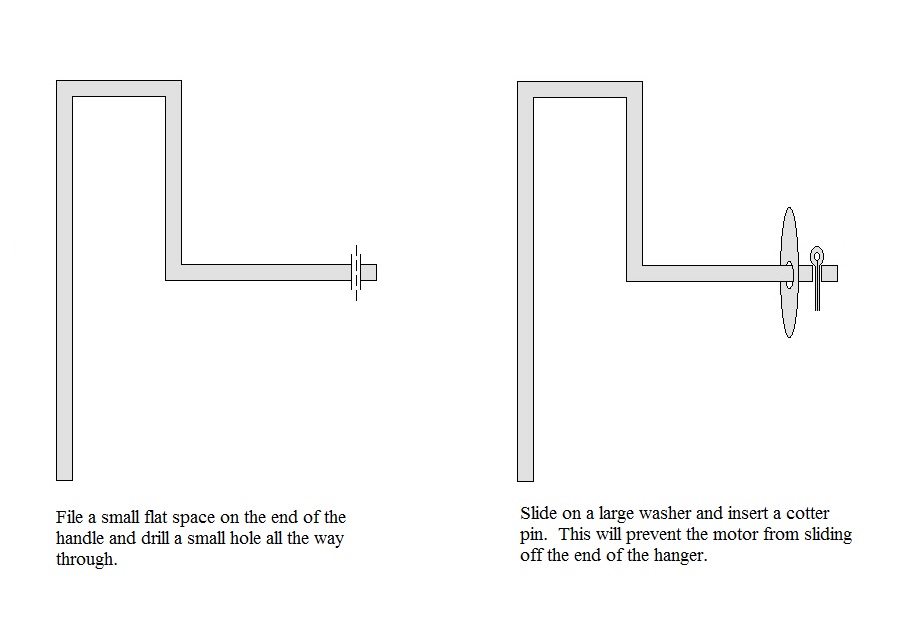
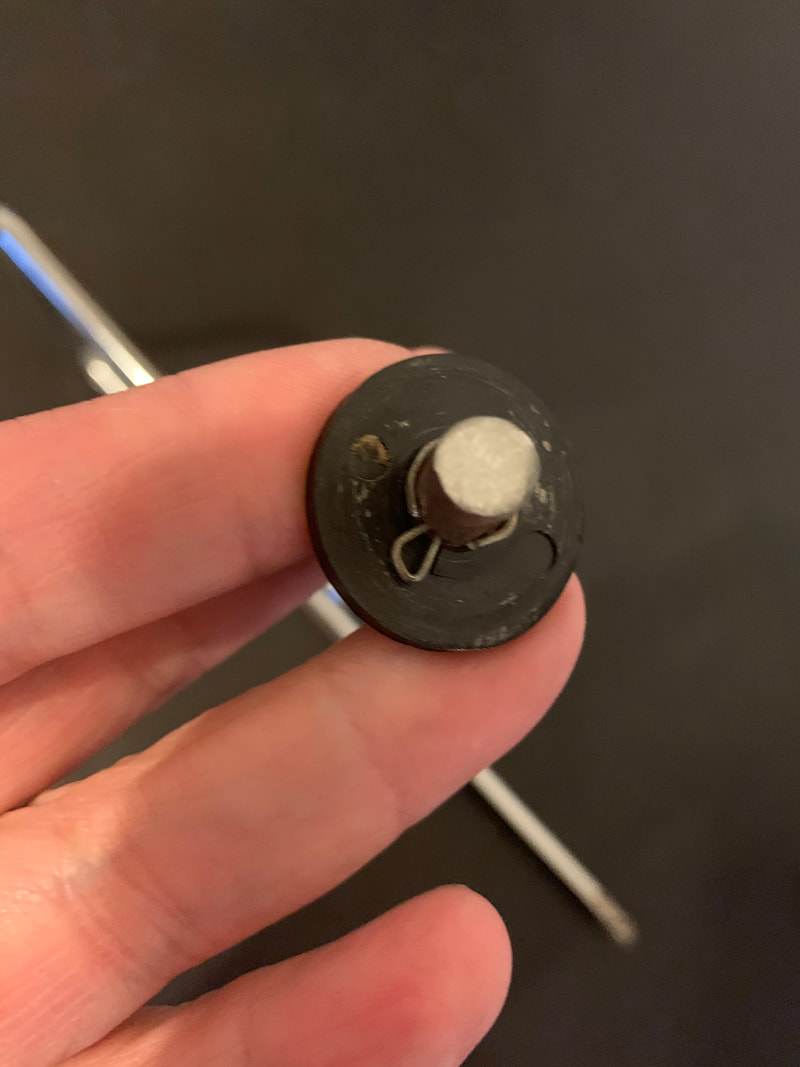
To make sure the motor won’t just slide off the end of the hanger, file a small space near the end to flatten it. Drill a hole through the rod, then slide a washer on the rod and put a cotter pin through the hole to secure it all in place.
If the pipe isn’t long enough to hold the motor at the desired height, you can insert a section of smaller pipe into the 12 mm (½”) pipe. The insert can go all the way to the bottom, or you can drill a hole through the pipes and secure them together at the desired height. Insert your hanger into the pipe, hang your motor and you’re ready to go!
EDIT: Januray 29,2020
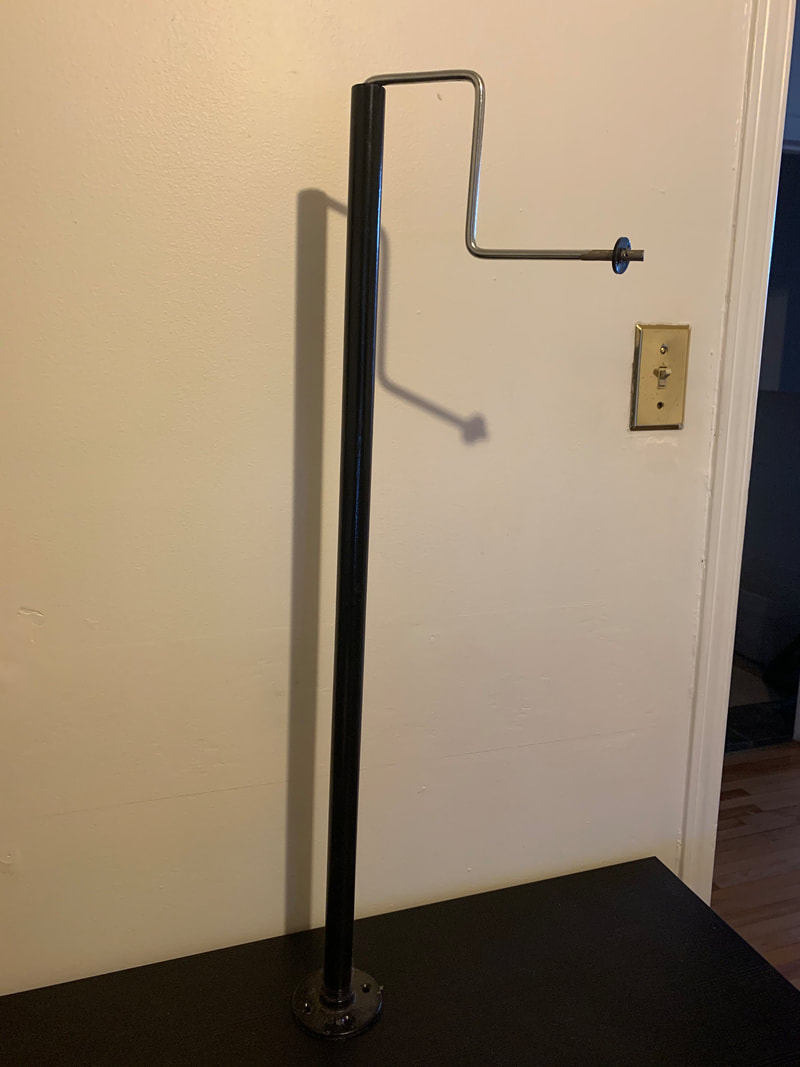
I've added a few pictures of the finished hanger as requested in the comments. :)
I've added a few pictures of the finished hanger as requested in the comments. :)
 |
|


Accessories
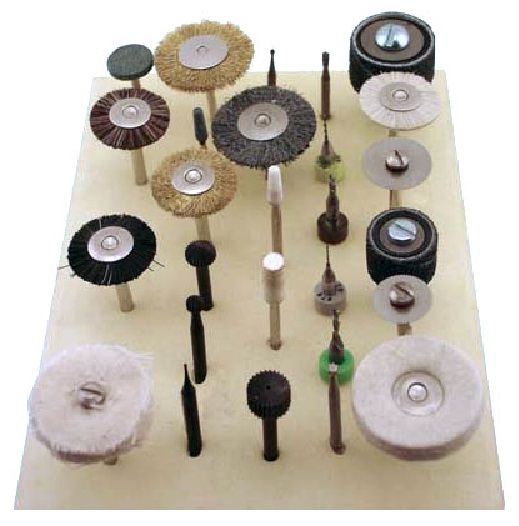
Burs, drill bits, diamond bits, sanding discs, buffs; these are just a few of the hundreds of tools that you can use with the flex shaft. I’m not going to even try to name them all because there really are too many to list! Instead, I’d like to touch on a few accessories that make this incredible tool even more invaluable to your studio.
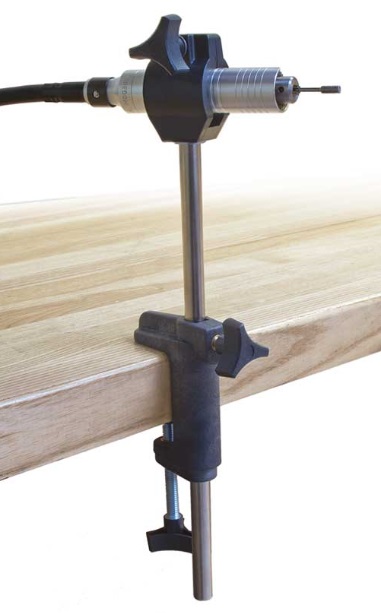
Flex shaft hand piece holders allow you to bring the piece to the tool, which can give you that much more control for certain work.
 |  |
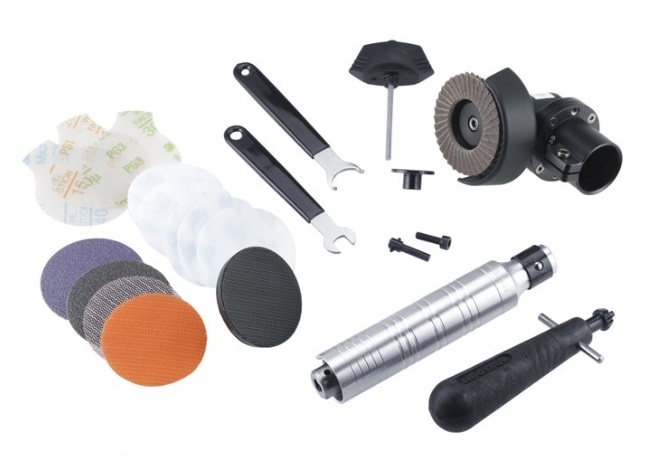
This attachment allows you to use the flex shaft as a right angle grinder. Coupled with the hand piece holder, you could turn the flex shaft into a disc sander.
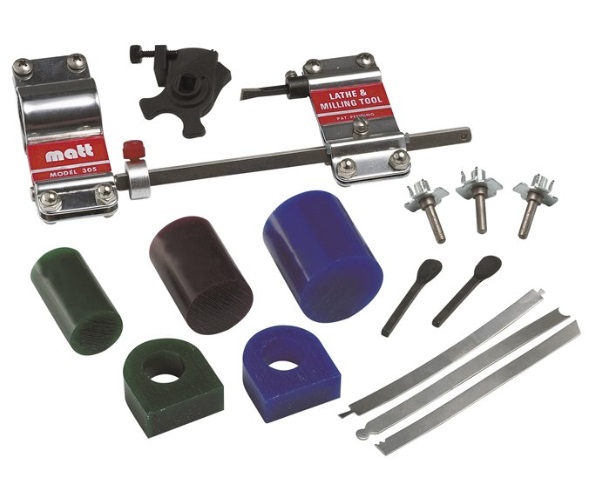
This tool would be of particular interest for jewellers that carve wax models, as the flex shaft can be turned into a mini lathe.
Belt sanders are useful tools, and there are two kinds of attachments that will allow the flex shaft to be used for this purpose.
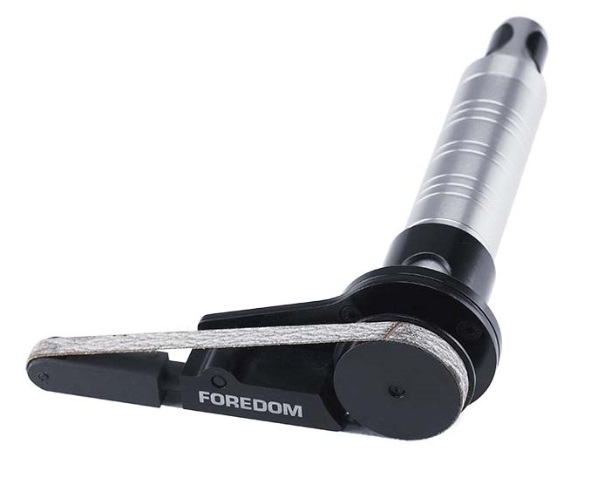 Foredom Belt Sander | 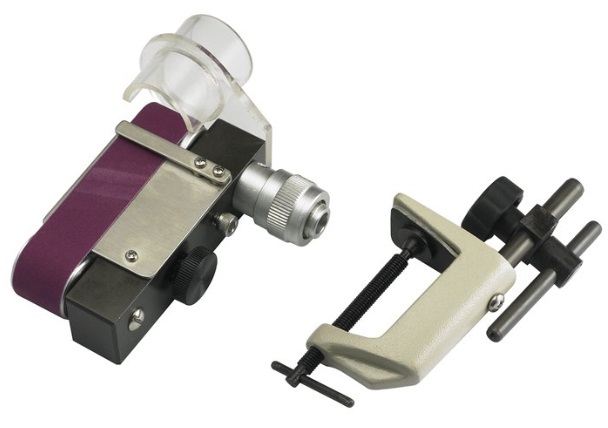 Wolf Belt Sander |
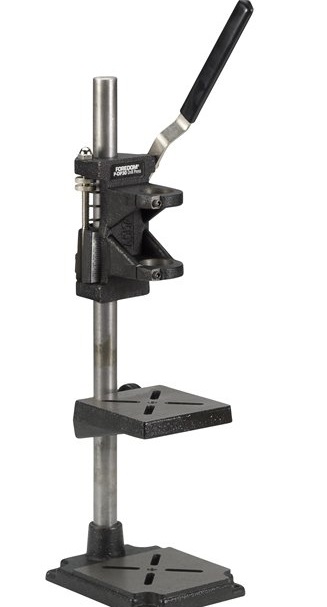
For those projects that demand a number of holes to be drilled, or need a lot of precision in the drilling process, this handy attachment turns the flex shaft into a drill press.
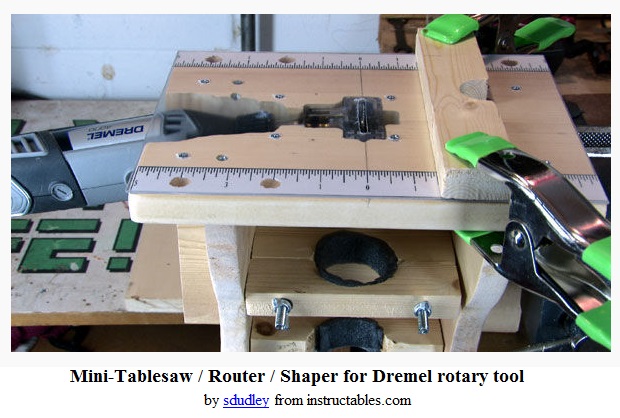
For the DIYers out there, you can even make an attachment that will turn your flex shaft into a mini tablesaw/router/shaper! This one is meant for a Dremel tool, but it wouldn't take much modification to adapt it for a flex shaft. Click the link for step by step instructions on making and using this little gem.
As far as I'm concerned, the flex shaft is a "must have" tool for the shop. Like many jewellery artists just starting out, I began with a Dremel rotary tool from my local hardware store. Though I still use it for some things, I find the flex shaft more powerful, versatile and easy to use. Is it expensive to buy? Prices range from under $100 to over $500. For a Foredom flex shaft kit, including a hanger, motor, shaft, #30 hand piece, foot control, bur holder, a tube of grease and possibly a few accessories, you'll probably pay around $250-300. But if you take care of your system properly, it can last you 30 years. It's a good return on your investment.
 RSS Feed
