Lora's Creations
Lora's Creations is on Facebook!
  • Home
  • About Me
  • Gallery of Sold Items
    • Necklaces
    • Pendants
    • Bracelets
    • Earrings
    • Rings
    • Brooch/Pin
    • Other
    • Sets
    • Sculptures and Wall Art
  • Contact Me
  • Guestbook
  • Links
  • Lora's Creations Blog

Pearls

4/26/2016

2 Comments

 
Picture
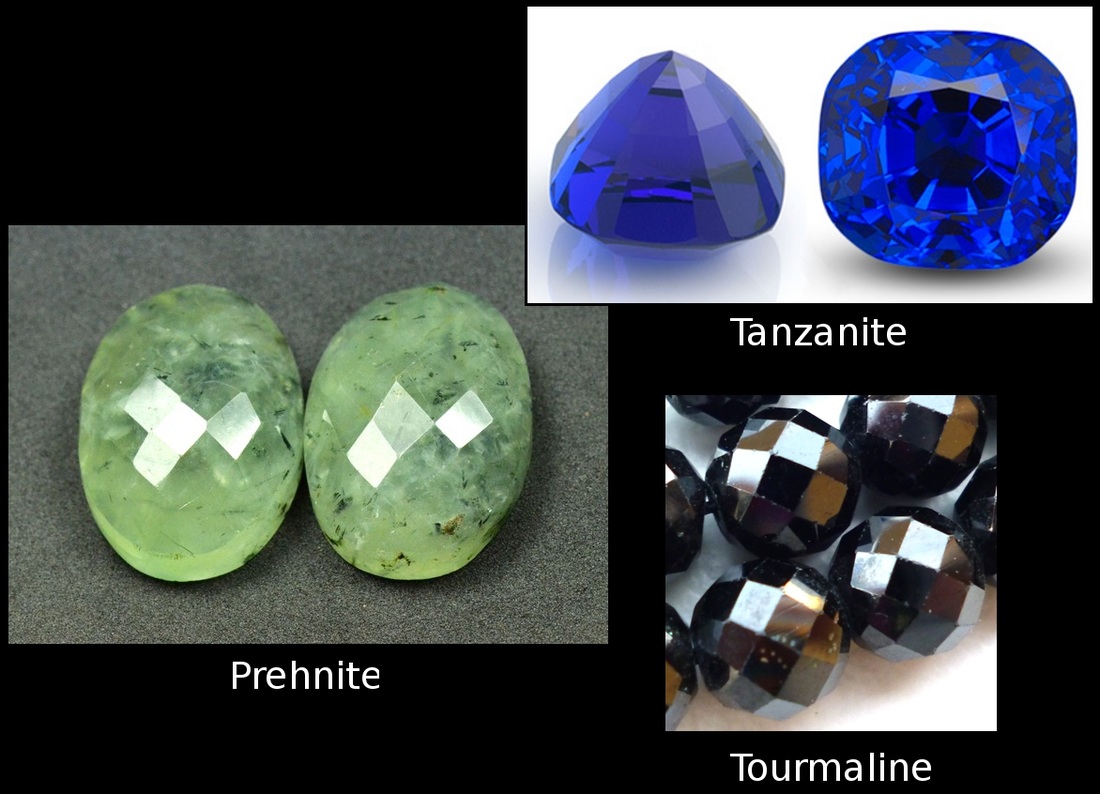
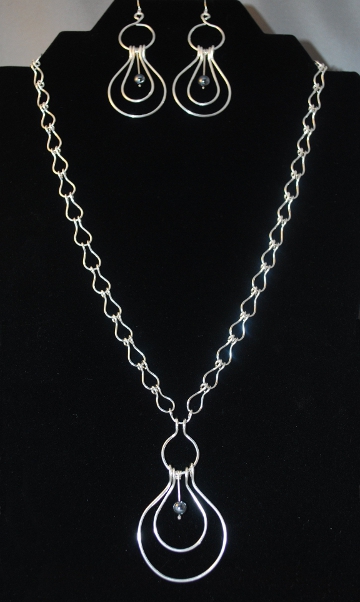
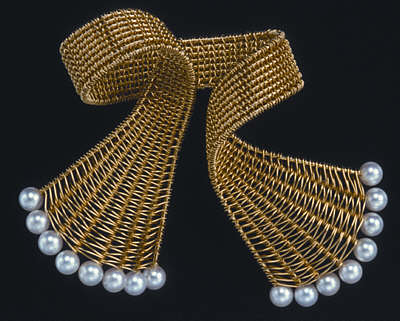
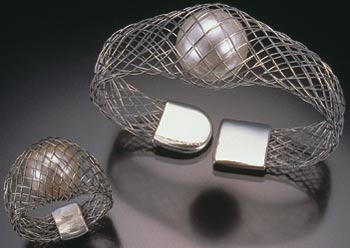
Pearls have been valued and cherished for centuries by cultures around the world.  Ancient Greeks believed pearls to be tears of joy, shed by the goddess of love, Aphrodite.  Ancient Egyptians associated pearls with the goddess Isis.  Arab legend declares that pearls are dewdrops filled with moonlight which fell into the ocean to be swallowed by oysters.  Only the rulers of the Roman Empire were allowed to wear pearl jewellery in the first century B.C., as proclaimed by Julius Caesar.  That tradition was also followed by royalty of the British Empire in their heyday.  Even recently, pearls were worn almost exclusively by royalty and the wealthy upper class, as they were very expensive and no one else could afford them.    Other references in great works of literature and art speaks to the importance and worth placed on pearls.  According to the King James Bible, the very Gates of Heaven are made of pearls. 

Picture


​More readily available and affordable now than in the past, pearls still hold a special place in the hearts of many and their beauty is undeniable.

There are a few terms to be aware of when talking about pearls:

Freshwater and Saltwater Pearls

Picture
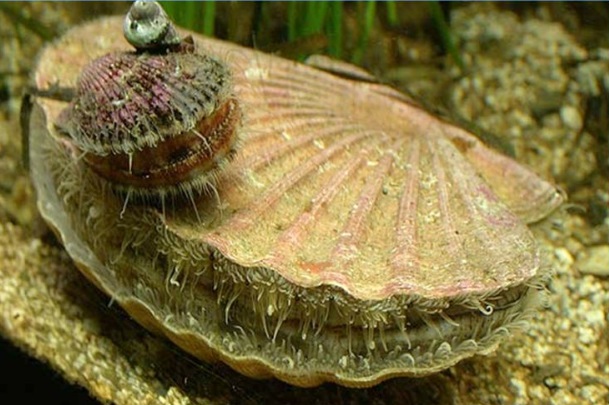
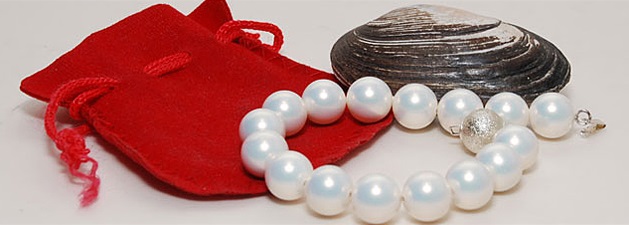
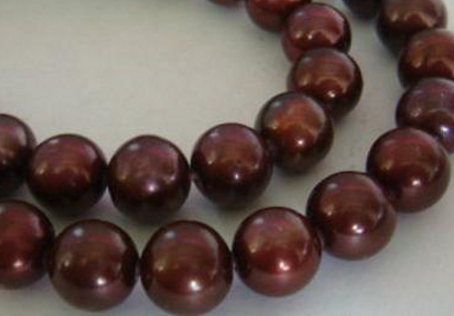
If a person is asked where pearls are produced, most people will think of the oyster.  They’re not wrong, saltwater pearls do indeed grow in oysters.  However there is a freshwater variety of pearl which are formed in several species of freshwater mussels.  When buying pearls, you might see SWP, saltwater pearl or FWP, freshwater pearl.  Saltwater pearls have been considered more valuable, as they were rounder and had a better lustre than freshwater pearls.  Freshwater pearls tend to be more irregular in shape with a softer sheen.  With recent improvements in pearl farming techniques however, FWP are now approaching the roundness and lustre so prized in the saltwater variety.

Natural and Cultured Pearls

Picture
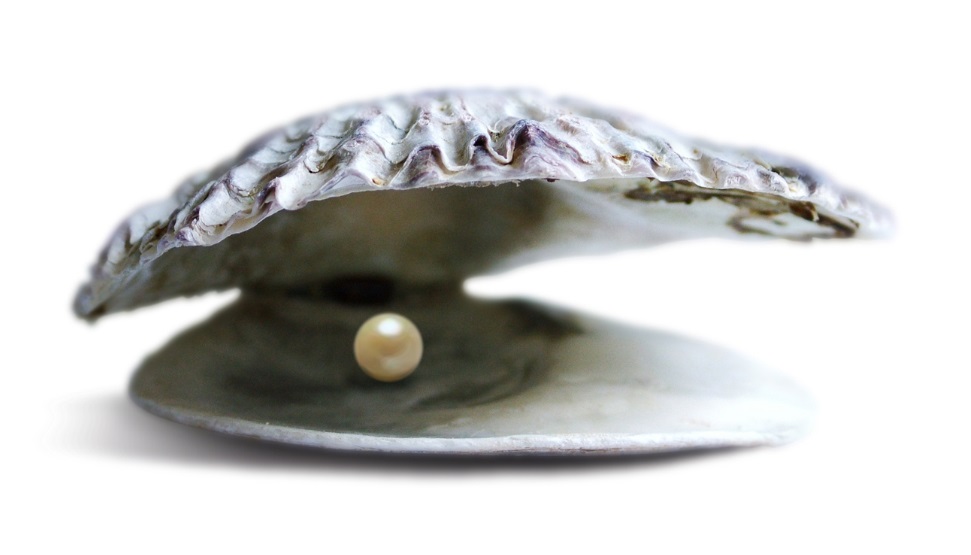
Pearls form when an irritant finds its way into an oyster or mussel.  That irritant is coated in a fluid in order to protect the soft tissue of the mollusc.   In natural pearls, that irritant, which is usually a parasite and not a grain of sand (sorry to burst your bubble!) is an accident of nature, most often happening when the shell opens to allow the bivalve to feed.  The formation of a cultured pearl is the same, the difference lies in the nature of the irritant and the method of introduction.  A bead or a piece of shell is surgically implanted in the mollusc, and nature takes care of the rest.
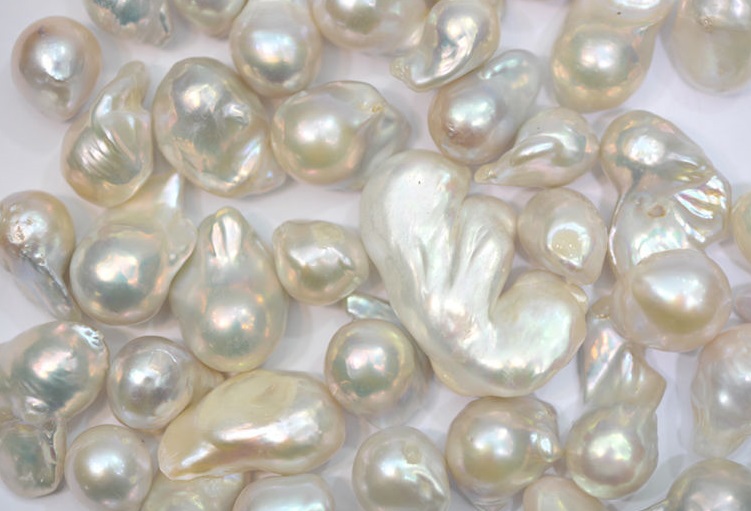
Baroque Pearls

Picture

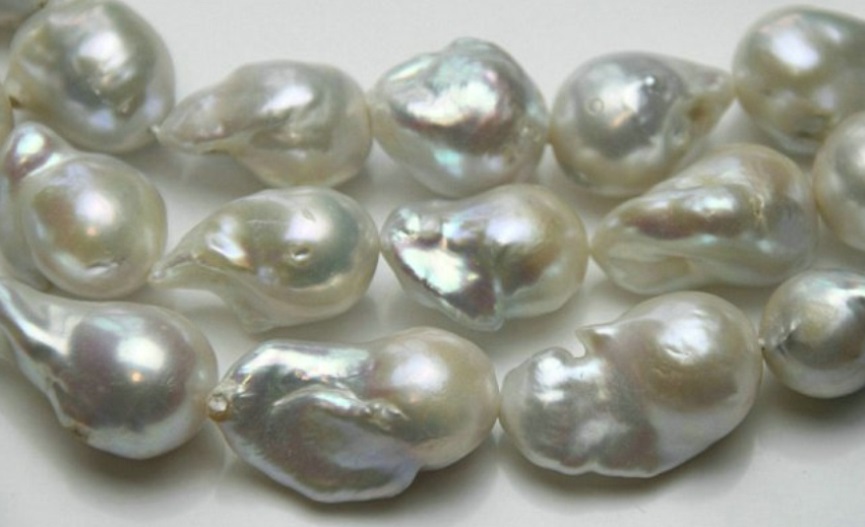
Baroque comes from the Portuguese barroco, meaning misshapen pearl.  So a baroque pearl is simply a pearl that has no regular shape.


Nacre (NAY-ker)

Picture
I mentioned that the starting point for every pearl is an irritant that is coated in a fluid as a defence mechanism.  That fluid is called nacre and is also known as mother-of-pearl.  The inner lining of many mollusc species is made of nacre and of course, it is the main ingredient of pearls.  Once the irritant is introduced, it is coated with layer upon layer of nacre.  To give you an idea of the timeline, a mussel may take 3 years to mature to a point where it can be implanted with an irritant.  Once in place, it can take another 3 years for the layers of nacre to reach the thickness required for a gem quality pearl.

Cyst Pearls and Blister Pearls

Picture
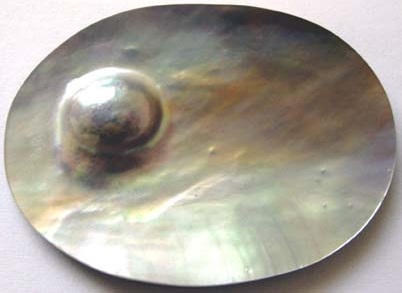
Where the pearl grows will have an important impact on its shape.  A cyst pearl is grown entirely within the body of the mollusc and is a three dimensional form, the typical pearl familiar to us all.  A blister pearl, or Mabe (MAH-bay) pearl grows against the shell and so is often quite flat.


Non Nacreous Pearls

Picture
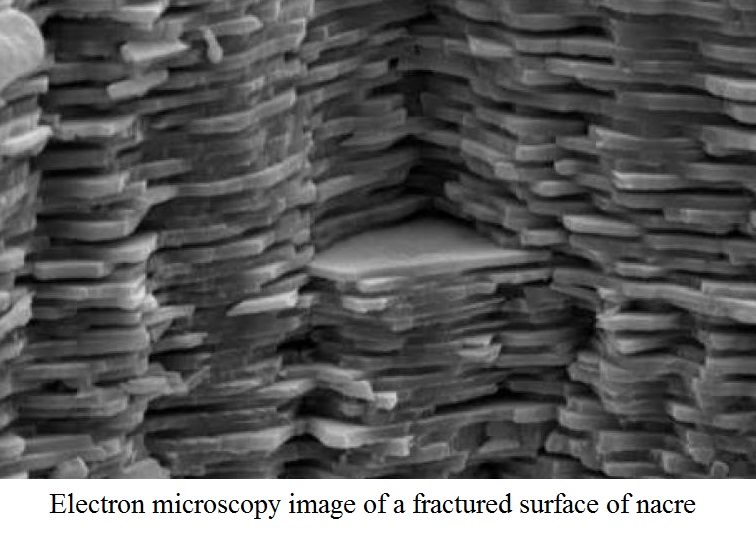
This can be a little confusing.  All pearls, nacreous and non-nacreous are made of the same thing; calcium carbonate.  This calcium carbonate has two distinct crystal forms, calcite and aragonite.  Aragonite has a more orderly crystal structure which allows the light to reflect and refract through the layers.  This is the nacre version, the beautiful mother-of-pearl appearance we associate with pearls.
The calcite version doesn’t have the same light bending properties so it lacks the iridescence of the aragonite.  It is dense, like thick porcelain.

Picture
​
The best of these pearls have a shimmering effect known as flame structure.

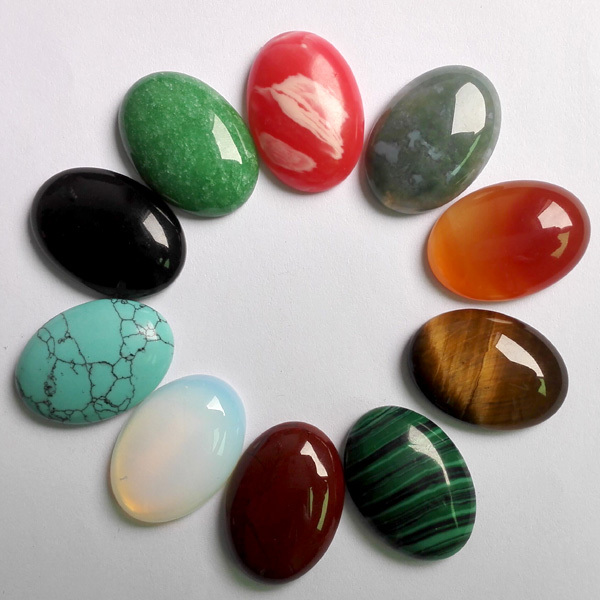
Just about any shelled mollusc is capable of producing a pearl of some sort, but the majority are of the non-nacreous kind.  Some of the most common are produced by conches, scallops, Melo Melo and giant clams.
Picture


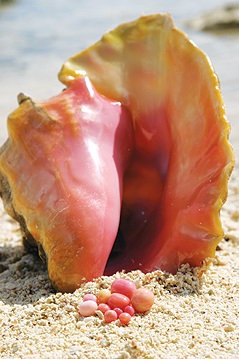
​Conch (konk) pearls are produce by a large marine snail, the queen conch.  The pearls are usually ovoid and small, ranging from white to a vibrant pink colour.


Picture
Scallop pearls are found in a species native to the coast of Baja, California.  Fairly new to the market, they vary in size and shape.  The colours range from cream to salmon or mauve with a semi-metallic sheen on the mosaic like patterns.

Picture


Some of the hardest pearls to find come from the marine baler snail, known as Melo Melo.  The pearls from this mollusc are round, smooth and can be quite large.


Picture
Some of the largest pearls in the world are produced by the Giant Clam.  These pearls are perfect examples of the difference between the nacreous and non-nacreous varieties.  Thick, dense and white, it lacks the layers of light and colour and is mono-chromatic.
​

Nacreous Pearls

Akoya

Picture
 
Akoya pearls have been grown off the coast of Japan for almost a century.  That classic strand of white round pearls that everyone knows and loves?  Those are probably akoya pearls.

Tahitian

Picture
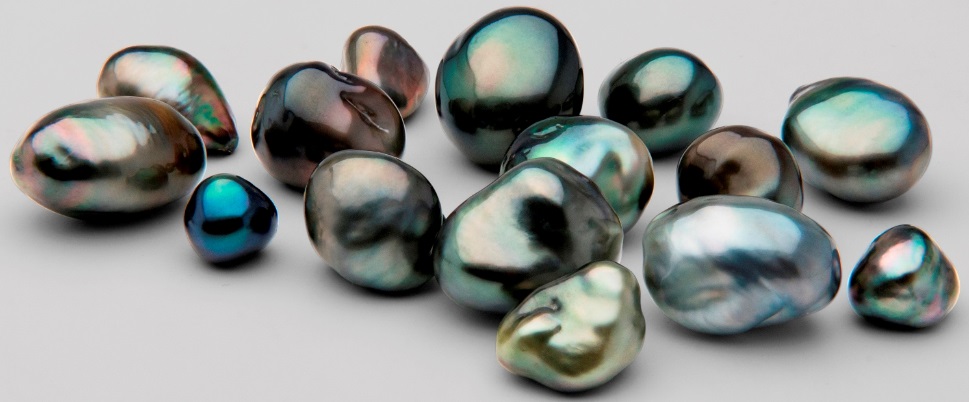
Tahitian pearls are the only naturally dark pearls.  They come in many different colours, but they are often referred to as black Tahitian pearls.  Round pearls of this type are rare; they are more common in shapes such as drops, ovals or baroques.

South Sea

Picture
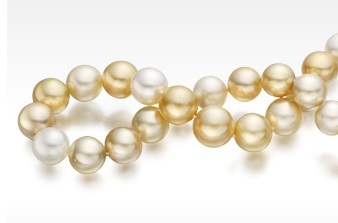
The largest saltwater pearls grown today are South Sea pearls grown in Australia, the Philippines and Indonesia.  They range in colour from white to gold.  Like the Tahitian, round pearls are rare, while the drops, baroques and ovals are more common and equally valued.


Freshwater

Picture
FWP range from round to free-form baroques.  They come in white and pastel colours and generally have a softer lustre than the akoya pearls.  They are definitely the most affordable of the pearls, and they offer the widest range of options.

Pearl Grading

There is no agreed upon standard of grading for pearls, every company sets its own scale for quality.  Some of the common traits that are looked for in gem quality pearls are lustre, shape, defects in the surface and colour.

Imitation Pearls

Imitation pearls are often made by dipping a glass bead into a solution made from fish scales.  The coating this produces is very thin and will likely to wear off.  The Spanish island of Mallorca is famous for its imitation pearls, and the terms Mallorca Pearls or Majorica Pearls are frequently used to describe these counterfeits.  
 
One way to tell if your pearls are real or fake is to rub them across your teeth.  Fake pearls will glide across, while real pearls feel gritty.

Caring for your Pearls

Pearls are the only organic gemstone, and they need some special care.  Sun block, perfume, cosmetics, hairspray; all contain chemicals that can damage the delicate nacre and dull the lustre of a pearl.  Even the natural acids in body oils and perspiration can cause damage.  As a general rule, your pearls should be the last thing you put on (at least 30 minutes after applying personal care products) and the first thing you take off.  To protect your pearls, wipe them with a damp cloth after you wear them.  This will help remove those chemicals that can do damage.  Pearls are a very soft gemstone, so keep them separated from harder jewellery items.  A soft cloth pouch is ideal.  Don’t store them in an airtight place like a zip lock bag; this will cause them to become brittle.
Picture
Pearls are a reminder that great things can come from humble beginnings.  Who would think that the product of an irritation in the innards of a strange looking marine creature could end up as prized possessions of gods and rulers of nations?
2 Comments

Flex Shaft

2/14/2016

3 Comments

 
Picture
The flex shaft may be the single most used and versatile tool in my workshop.  It can be used while working with plastic, glass, metal, stone, wood or wax.  With this tool, I can grind, sand, polish, drill, hammer, carve, saw and more.  The flex shaft system consists of 4 basic parts:  the motor, the flexible shaft, the hand piece and the speed control.  There are different types of motors, hand pieces and speed controls; some for general use, some for more specialized applications.  The system you choose will depend on what you want to do with it.   I’m going to focus on the Foredom SR as this is what I have in my workshop, but there are several different brands out there that do the same job.

Motor

One of the most common motors used by jewellers has about 1/6 HP and runs in forward and reverse up to speeds of 18000 RPM.  This motor runs on standard household voltage of 115V.  The motor is basically a sealed unit, and it requires very little in the way of maintenance. 
Picture
 It has 2 carbon block brushes that should be checked at regular intervals, I usually do this every 100 hours of use.  There are two screw plugs, one on each side of the motor.  Remove these and the brushes are right there.  The brushes are about 19 mm (¾”) long when new, and they should be replaced when they are worn down to 7 mm (¼)”.  You should also check to see if there are any unusual wear patterns in the brush, and that it is wearing evenly. 

Picture
A little blast of canned air in the vents will remove any dust or debris that could work its way into the motor housing.  This should be done every 40-50 hours and I usually synchronize this task with the shaft maintenance. 

Flexible Shaft

The flexible shaft is exactly what it sounds like.  It is a shaft driven by the motor which in turn drives the handpiece, allowing you to perform all these wonderful functions.  Oh yes, and it’s flexible.   Be careful though!  Bending the shaft too sharply, looping it, or bending it near the attach point at the motor or hand piece can damage it.  Make sure you keep the shaft loose with wide bends in order to keep it operating in the best possible condition.
Picture


The shaft consists of two parts; a rubber outer sheath which protects the inner shaft..  The shaft does require regular maintenance to keep everything running in optimum condition.


The shaft should be regreased every 40-50 hours of use.  If you don’t have flex shaft grease, use a high quality white lubricating grease.  Here’s a step by step for regreasing the shaft:
Picture

Safety first! Unplug! The last thing you want is for things to start spinning at high speeds with your fingers in the way. By the same token, long hair should be pulled back, loose clothing should be tucked and the general area should be clean and clutter free. Gather all your materials and tools, I hate being in the middle of a task and then realizing that I have to drop everything and run to get something else.

Remove the hand piece, it just pulls off.  Loosen or remove the set screw at the top of the shaft on the motor connector..  Slide the sheath off the shaft and inspect the sheath thoroughly; if it is worn or damaged it should be replaced.  Inspect the shaft and spring for damage.
Picture
Picture
Apply a light coat of grease, leaving the bottom 100 mm (4”) bare. This will prevent any excess grease from getting into the hand piece.

Picture

Slide the sheath back on, leaving 19-25 mm (¾-1”) of the shaft key showing.  Tighten the set screw at the top of the shaft.

Hang the shaft up and plug it in. Let the shaft hang straight down and have the tip dangling in an empty pail or garbage can.  Run the motor at high speed for about 10 minutes.This will distribute the grease evenly on the shaft and let any excess grease drip out. (Hence the pail, to catch the drippings!)  Wipe any grease off the shaft key.

Hand Pieces

There are several different types of hand pieces, many of them for specialized use.  The most popular are the #30 hand piece and the #20 quick change hand piece.

The #30 is a general purpose hand piece with a 3 jaw Jacob’s chuck that will accept any size shank up to 4 mm (5/32)”.  This hand piece is basically maintenance free, requiring no lubrication
Picture
#30 Hand Piece
Picture
#20 Quick Change Hand Piece
The #20 is also a general purpose hand piece which has a lever that allows accessories to be changed very quickly.  The drawback is that this type of hand piece has a collet instead of a chuck and can only accept one size shank, in this case 2.35 mm (3/32”).  The collet can be adjusted or changed if needed, otherwise this hand piece is also maintenance free.
Hand pieces are the most personalized thing about the system.  Each style has something that may appeal to different people.  There are specialized hand pieces for hammering, which is something a stone setter may wish to invest in; or for chiselling, which a carver would find useful.  Again, do your research.  What you will be doing with the flex shaft will determine what kind of options you need. 

Speed Controls

Picture
There are two basic types of speed controls, hand operated and foot operated.
Hand operated controls are mounted on the bench and allow you to set a speed.  You can then return to that speed time and again by using an on/off switch. 
Foot operated controls sit on the floor under the bench.  They are a variable speed control, just like a gas pedal in a car, the harder you press it, the faster it goes.
Speed controls are also maintenance free, though I find that the foot operated control needs to be cleaned every now and again.

Motor Mounts

Picture

Flex shafts can be mounted on a bench top, but are more commonly hung up like a pendant.  For the pendant style, you can buy ready made hangers for one or two motors, or there are many DIY projects that will work as well. 

DIY Flex Shaft Hanger

Materials

90 cm (3’) long section of 12 mm (½”)
     steel pipe, threaded at one end for   
     at least 25 mm (1”)
steel flange
paint roller
large washer, cotter pin, nuts and bolts
Picture
Picture
Thread the steel pipe into the flange and tighten as much as you are able.  Paint the pipe and flange in the colour of your choice.  Painting them after you’ve attached them together will also help prevent accidental loosening.  Secure this apparatus to your bench using the correct size of nuts and bolts.

Remove the handle and the roller cage from the paint roller.  This is the perfect shape to use as a hanger for the motor.  One end goes in the pipe you secured to the bench, the other holds the motor.  If the part of the rod where the motor will hang is too long, cut it as desired.  Just make sure you leave enough room so that the motor can hang without being jammed up against the pipe. 
Picture
To make sure the motor won’t just slide off the end of the hanger, file a small space near the end to flatten it.  Drill a hole through the rod, then slide a washer on the rod and put a cotter pin through the hole to secure it all in place.
Picture
If the pipe isn’t long enough to hold the motor at the desired height, you can insert a section of smaller pipe into the 12 mm (½”) pipe.  The insert can go all the way to the bottom, or you can drill a hole through the pipes and secure them together at the desired height.  Insert your hanger into the pipe, hang your motor and you’re ready to go!


EDIT: Januray 29,2020

I've added a few pictures of the finished hanger as requested in the comments.  :)
Picture
Picture
Picture
Picture
Picture

Accessories

Picture

Burs, drill bits, diamond bits, sanding discs, buffs; these are just a few of the hundreds of tools that you can use with the flex shaft.  I’m not going to even try to name them all because there really are too many to list!  Instead, I’d like to touch on a few accessories that make this incredible tool even more invaluable to your studio.

Flex shaft hand piece holders allow you to bring the piece to the tool, which can give you that much more control for certain work. 
Picture
Picture
Picture
This attachment allows you to use the flex shaft as a right angle grinder.  Coupled with the hand piece holder, you could turn the flex shaft into a disc sander.

Picture


This tool would be of particular interest for jewellers that carve wax models, as the flex shaft can be turned into a mini lathe.

Belt sanders are useful tools, and there are two kinds of attachments that will allow the flex shaft to be used for this purpose.
Picture
Foredom Belt Sander
Picture
Wolf Belt Sander
Picture


For those projects that demand a number of holes to be drilled, or need a lot of precision in the drilling process, this handy attachment turns the flex shaft into a drill press.


For the DIYers out there, you can even make an attachment that will turn your flex shaft into a mini tablesaw/router/shaper!  This one is meant for a Dremel tool, but it wouldn't take much modification to adapt it for a flex shaft.  Click the link for step by step instructions on making and using this little gem. 
Tablesaw/Router/Shaper for Dremel Rotary Tool on Instructables
Picture
As far as I'm concerned, the flex shaft is a "must have" tool for the shop.  Like many jewellery artists just starting out, I began with a Dremel rotary tool from my local hardware store.  Though I still use it for some things, I find the flex shaft more powerful, versatile and easy to use.  Is it expensive to buy?  Prices range from under $100 to over $500.  For a Foredom flex shaft kit, including a hanger, motor, shaft, #30 hand piece, foot control, bur holder, a tube of grease and possibly a few accessories, you'll probably pay around $250-300.  But if you take care of your system properly, it can last you 30 years.  It's a good return on your investment.

Happy Creating!

3 Comments

Riveting Part 2

12/28/2015

1 Comment


Tube Rivets

Picture
Tube rivets can make a very interesting design element and they can also serve a practical purpose.  A tube rivet is a great place to put a jump ring or other attachment to work as a bail or linking mechanism. 

Picture
Before we jump into the riveting, let’s take a look at the tubing.  Tubing can be found in many different sizes and it is measured in a couple of different ways.  It can be measured by its outside diameter (OD) or it’s inside diameter (ID).  When choosing the size you want and when drilling your holes, make sure you are referencing the right measurement.  Another thing to consider is the thickness of the tube wall.  If it is too thick, it will be more difficult to rivet, if it is too thin it may tear instead of curling over.  When in doubt, go thicker.  The best advice is to make a practice piece and see what works.  The third thing to consider when choosing your tubing is whether or not it is seamless.  Seamed tubing will have a tendency to split as it is being set.  With seamless tubing, that should be less of an issue.

Once you’ve chosen the size of tubing you want, you need to determine the length that you’ll need to make your rivet.  The rule of thumb is that you’ll want ½ the diameter of the tube sticking out from each side of your piece.  So, if you are using 5 mm (OD) tubing for example, you’ll want 2.5 mm sticking out from either side.  If you are riveting together two pieces that are 1 mm thick, then you’ll want to cut a length of tubing that is 7 mm long.  (1 + 1 + 2.5 + 2.5 = 7)  I would suggest cutting the tube a fraction longer than what you need to allow for filing and cleanup after the cut.
Picture
When you’ve determined the length that you’ll need, there are a few different ways to cut the tubing, depending on the diameter.  For larger diameter tubing, you may be able to use a tube cutter.  This tool is basically a blade and 2 rollers in a clamp.  Position that blade where you want the tube cut, and then tighten the clamp until the tube is held securely between the blade and the rollers.  Be careful not to over tighten, this will make cutting harder and may crimp the tube.  Once the cutter is in place, turn it around the tube until it spins freely.  Tighten the clamp a little bit and then spin it around the tube until it spins freely again.  Repeat this process until the tube is cut all the way through.  Clean up any burrs caused by the cutter.  

For tubing that is too small for the cutter, it’s easiest to use a jeweller’s saw.
​
Picture
I’ll stop here to say a few words about using the jeweller’s saw.  I experienced a lot of frustration and more than a few broken blades, before I figured out how to use it properly.  I’ll attempt to save someone else the same frustration….
You’ll notice screw clamps at the top and bottom of the frame.  The saw blade is inserted here with the teeth facing out and pointing down.  Tighten one clamp, I prefer to do the top clamp, but it’s up to you.  The blade needs to have some tension on it so you’ll have to push the top of the frame against something solid to compress the frame slightly.  Tighten the loose clamp securely while the frame is compressed.  The blade should give a high pitched “ping” when plucked.  Now that the saw is ready to go, use some lubricant such as candle wax, beeswax or BurLife on the back side (toothless side) of the blade.  The saw cuts on the downward stroke, but by starting on an upward stroke, you will wear a little groove in the metal that will make it easier to start the cut.

Picture

​Saw through the tubing with long steady strokes.  Let the saw do the work, you don’t need to put a lot of pressure on the blade.  There are pliers and jigs available to help make the sawing easier and more accurate.  

Picture
While they are nice to have, you don't need tube cutting pliers or jigs, you can just hold the tubing while you saw.  If you’re having a hard time holding the tubing still, drill a small hole in the side of your bench pin, slightly larger than the diameter of the tubing and a little bit longer than the length of tube you want to cut.  Insert the tubing in the hole, hold the other end in your hand and saw away, the tubing will be held in place. ​ If you don't want to drill into your bench pin, a piece of scrap wood held in a vise will serve the same purpose. 

Picture


​Once the tubing is cut, clean up any burs and file both ends of the tube flat.  Be careful when you’re filing; you don’t want to remove too much material.  Measure often!

When the tube is ready, assemble your piece, place the tubing into the rivet hole and place it on a flat, hard surface, such as a bench block.  Now you are ready to start setting the rivet and of course, there are a few different methods of doing this.
Picture

​You can insert an awl or other tapered tool into the tube and move it around in a circular motion, pressing against the top edge of the tube.  This will start to flare the top of the tube outwards.  Once it’s started, turn the piece over and do the same to the other side of the tube. 

Picture


​The second method is to place a small dapping punch into the top of the tubing and give it a couple of light taps to start the flare, then flip and repeat on the other side.

Picture


​The third process is similar, but instead of using one dapping punch, you use two.  Place one in a vise and fit the bottom of the tube onto it, then place the second punch in the top of the tube.  Tap it lightly a few times and this will help flare both ends at once.  It may not flare evenly however, so after a few taps, flip the piece and repeat.

Picture
No matter which method you’ve used to start the flare, the process is continued with progressively larger dapping punches until the tube expands and the edges start to roll over.  At that point, the tubing is sufficiently flared and you can work with just a hammer.  Some prefer the flat face of a riveting hammer, others, like myself; prefer to use the ball of a small ball peen hammer to continue.  

Picture
As you hammer the edges down, make sure you tap in a circular pattern around the outside with an outward and down motion.  This will push the metal out and down, not just down, and give it a nice rounded appearance.  
​For a flatter looking rivet, simply tap the rivet centrally with the flat face of the hammer.


Remember to tap one side a few times, then flip and tap the other side.  This will keep the tube from bending and will ensure that the rivet heads look even on both sides.  ​
​
Picture

​A tube rivet may also be used as a split rivet by sawing partway down the tube, dividing it into sections.  The sections then become tabs that are spread out and hammered down.

Blind Rivets

Picture
In the previous post we discussed wire rivets, and I forgot to mention one variation: the blind rivet.  Knowing how to make a blind rivet is wonderful when one side of your piece must not show any type of rivet at all.  The blind rivet is a mix of hot and cold connections as it requires the use of a torch.  One end of the rivet is soldered to the inner surface of one material.  The other material has holes to accommodate the rivet.  Once all the rivets are soldered and all the holes are drilled, the materials are assembled, the rivets are cut and filed to the right length and then set in the same fashion I described in Riveting Part 1.

Until next time, happy creating!
1 Comment

Riveting - Part 1

12/5/2015

0 Comments

 
Picture
One of my favourite cold connection methods is riveting.  It takes some practice to make good rivets but once you get the hang of it, it may become a favourite of yours as well. There are many different kinds of rivets and different ways to set them.  Pop rivets, solid rivets, tube rivets, split rivets, double rivets; these are all types that you can buy in a store and they are used in many different industries and applications.  For this series of posts though, I’m going to concentrate on two kinds of rivets, both of which you can make yourself; wire rivets and tube rivets.

Wire Rivets

This is the largest category, as it is the most common and versatile type of rivet. Wire rivets are also the simplest to make. All you need for materials are the pieces you wish to have riveted together and a length of wire to make the rivets.  I would recommend using 18 – 14 ga wire.  Anything smaller than 18 ga would make for a fairly weak rivet, not to mention the difficulty in trying to set it. The wire needs to be fairly soft to rivet easily.  If you’re not working with dead soft wire, you may want to anneal it.
These are some of the tools you’ll need to do your riveting.  Most of them will already be familiar to you. 
  • Calipers or other measuring tool
  • Wire cutters (flush cutters are preferable)
  • Flat file
  • Round needle file or diamond reamer
  • Drill, Dremel tool, or flex shaft
  • Drill Bits
  • Bench Block
  • Drilling platform (I use a scrap piece of 2x4)
  • Centre punch 
You will also need some hammers, specifically, a riveting hammer and/or a small ball peen or chasing hammer.

A riveting hammer has one flat face and one thin edged face or cross peen which is used to start and expand the rivet head.
A small ball peen hammer also has one smooth flat face; the other side is a ball.  Choose the smallest ball peen you can find.  Personally I’ve only used the ball peen hammer for setting rivets, though I do understand how the riveting hammer can be an asset.
So let’s get straight to riveting!
  • The first step is to measure the total thickness of the materials you want to join together.
  • Now you need to figure out how much wire you need to make your rivet.  There are a number of different opinions on just how much wire should be sticking out on either side of your materials.  Some say a length equal to the thickness of the wire, others say less than 1 mm, and still others suggest up to 1.5 mm.  Everyone agrees though; if you cut it too short, you won’t have enough to make a secure head.  If you leave it too long, the rivet may buckle or you may end up with a messy head that requires a lot of clean up.  Personally, I find that leaving about 1 mm sticking out each side works well.  As you gain experience, you can play with the length and see what works for you.  File both ends of the wire flat.                                                 
TIP
Tape a couple of playing cards together, or find a piece of scrap the right thickness.  Punch or drill a small hole in it.  Put one of these handy little guides on each side of the materials you want to rivet.  Put your wire through this sandwich and cut it flush on both sides.  Voila! Consistent and equal length for your rivets!

Picture
Put the materials on a steel block, and use a centre punch to make a divot where you want to put your rivet holes.  The divots will act as a guide for your drill bit so it won’t chatter all over your piece before biting in and drilling the hole.

Now place the material on your drilling platform.  (I use a scrap piece of a 2x4, but any small flat piece of wood at least 1” thick will do.)  Using a bit the same size, or slightly smaller than your wire rivet, drill the holes in the materials, using the divots as your starting point. The drill should already be turning slowly before it touches the metal.  Putting the drill on the metal and then starting it really heightens the chance of breaking the bit.  Don’t forget to lubricate your drill bit!  Let the bit do the work, you shouldn’t have to use a lot of force to drill the hole.  If you find it’s not working well, make sure the bit is turning the right way.  Some drills and flex shafts are reversible.  If you still have to push hard to get the bit to go through, then your bit may be dull.  Use a new bit, or sharpen the old one.
Often, when the drill bit punches through the other side of the materials, it will leave a jagged edge around the hole, called a bur. The burs need to be cleaned up so that you have a smooth surface.  You can do this a number of ways; the easiest is to use a larger drill bit.  Just hold the bit in your fingers, place the cutting tip on the hole you just made and give it a twirl or two.  That should shave away the burs.  Be careful though, if you turn it too much, you’ll remove more material than you want.
The wire should fit snugly through the hole.  If the hole is slightly too small, use a diamond bit reamer or a small round file to enlarge it a bit.  File slow and check the fit often, you don’t want to end up with a hole that’s too big.  Does the wire fit nice and snug? Now you’re ready to rivet!
Picture
Starting the rivet is the trickiest part.  There are different ways to do it; I’ll share the one that I learned first.  This requires a fair bit of patience, coordination and practice, go slow, and make your hits lightly. Arrange your materials and tools so that you will be working at near eye level.  It’s very helpful to have a support on which to rest your non dominant arm.  With that hand, hold the pieces you’re riveting together (taping the pieces together will help keep them aligned).  Your wire rivet should be in place; you want one end up in the air, the other end resting on your steel bench block.  You have to keep the materials hovering in the middle.  This is a good test of your dexterity!  The way I learned to start the rivet head is by using the small ball been hammer, tap the face of the wire lightly a few times, starting in the centre and then working your way around the perimeter.                                                            

Picture


The other way is to use the cross peen face of a riveting hammer to hit the face of the wire, then once more 90 degrees from the first hit.

Whichever method you choose, once you've started the head on one side, turn the piece over and do the same to the wire face on the other side.  Continue to tap the wire lightly, trying to strike each side an equal amount.  The goal is to get the end of the wire to mushroom and spread out.  Don’t tap too hard or you’ll bend the rivet.  Once the wire has spread out enough that it can’t be pulled through the hole, it gets easier.  At that point, you just have to keep tapping, using the ball peen hammer and turning the piece now and again so that each side is hammered equally. When the danger of bending the rivet has past, you can tap harder, though you do want to be careful not to mar the materials you are riveting.  At this point, some people say to switch to the flat face of your hammer, I continue with the ball peen.
Picture
So how long do you have to hammer?  That depends on the answers to two questions:

Is the rivet solid and secure?
The rivet is really considered to be secure when there is enough metal overlapping the hole so that it won’t pull through or fall out. You also don’t want to see a lot of back and forth movement in the rivet as a general rule.  The pieces may swivel on the rivet, but that is normal.

Does it look the way you want it to look?
The appearance of the rivet head is really up to you.  Here are some tips to achieve some different looks.
Picture
Dome 
Once the rivet is set, focus the hammering along the perimeter of the head to flatten the sides.  Be careful not to strike the main body of the piece.  If you can run your finger across the rivet and you don’t feel any ridges or sharp edges, you’re done hammering.  You can clean it up with some sandpaper and/or buffing compound, but don’t overdo it!  You’ll undo all your hard hammering work.  

Straight edge Head
Set the rivet and then clean it up.  The only problem with this shape is that it tends to catch on clothing and what not.


Simulated Screw Head
This look is easy to achieve with either the domed or straight edge heads.  Using a jeweller’s saw, or a small triangular file, cut a groove across the centre of the head.  This is a great look for steampunk pieces.


Picture
Counter sunk Head
Also called a “disappearing rivet”, this type has to be thought out a little beforehand.  If you want the surface of our piece to be perfectly smooth and flat, you can’t just sand down the rivet head or you’ll just end up removing it.  Instead, you have to make a small space below the surface of the material that will be filled by the rivet.  There are special countersinking bits available, but a larger drill bit will work just as well.  I suggest doing this by hand or with a pin vise as a drill or flex shaft may work too fast and you’ll just end up with a bigger hole. 

Picture
Put the tip of the large drill bit in the hole you have drilled (make sure it’s on the outside surface of the piece!)  Just turn the bit slowly a few times until it has shaved a bit of metal from the edges of the hole.  It should look like this:           

Picture
Now assemble your piece, making sure the countersunk holes are facing out, and rivet as normal.  As the metal spreads out, you may want to switch to the flat face to finish it. The metal will spread into the void left by the bit and will still be a secure rivet when you sand the outside perfectly flat.

Picture
If you don’t want to do the balancing act as  I described above, you can also pre-form the rivet heads.  If you don’t’ have a torch, then you’ll need a flat sided pair of toothy pliers and a vise.  Grip your wire with the pliers, with 1 mm sticking up and the rest sticking down between the jaws of the vise.  Hammer the wire as I described before until it has expanded enough that it won’t pass through the hole. Then assemble your piece and hold it with the preformed head resting on the steel bench block and finish setting the rivet as I described above.

Picture
There is an even easier way to pre-form the head if you have a torch. It doesn’t need to be a full oxy/acetylene or oxy/propane set up, a butane micro torch will work fine.  What you need to do is draw a bead on one end of the wire, and here’s how.

Picture
Cut a short length of wire, dip it into some flux (most important for sterling silver) Hold the tip of the wire in a pair of pliers (use ones that you don’t mind getting burned), with the wire pointing down.  Turn on your torch and hold the end of the wire in the flame, just in front of the inner cone.  It won’t take long before the end of the wire melts and draws up into a ball.  Remove the flame, quench the wire and pickle if needed.  The size of the bead will determine the size of the rivet head.

Picture
Using the rear side of a drawplate, or a piece of steel plate with a hole the same size as the rivet drilled through, insert the wire through the plate so that the balled end is resting on the plate and the rest of the wire is protruding through.  Set the plate on a sturdy surface, making sure there’s a spot for the wire to hang in.  Hammer the ball into the shape you desire, then assemble your piece and hold it with the preformed head resting on the steel bench block and finish setting the rivet same as above.

Riveting Tips
Picture
Normally, a piece that is riveted together is fairly solid, there’s not a lot of movement, though it might swivel slightly with pressure.  If you want your pieces to swing freely, simply insert a very thin piece of cardboard or thick paper between the materials before you start riveting.  A business card works just fine.  Once your rivet is set, soak the entire piece in water and the paper will become soft and start to dissolve, making it easy to remove.  Another option to remove the paper is to burn it out, but that will require more clean up.

Picture
If you making a piece with multiple rivets, don’t drill all your rivet holes at the start!  Drill your first hole, set your rivet, then drill another and set your rivet.  Then go ahead and drill the rest of the holes.  The pieces are held securely together and you can drill with precision.  It’s so frustrating to measure carefully and drill all your holes, and then find they don’t quite match…..

Picture
You can make pieces with a little more dimension to them by leaving space between the materials.  All you have to do is insert a short length of tubing between the materials, making sure the rivet goes through the tube.  I’ve found that crimp tubes just the right diameter for 18 ga rivets, and they’re already precisely cut to size, with perfectly flat ends.  Believe me, that saves a lot of time!

Next time, tube rivets!  Happy creating!
0 Comments

Gemstones for Beginner's - part 3

10/21/2015

0 Comments

 
Gemstone treatments

Many gemstones are treated in some fashion, for a variety of reasons. Many are treated to enhance or change their colour or clarity. Others are fragile and have to be treated to increase their durability. There are some stones that are routinely treated in order to emulate a different kind of stone. A reputable dealer will disclose any treated gems if known, as will any reputable jeweller. Failure to disclose such details may result in civil and/or administrative actions by buyers and gem associations. This is a listing of some of the most common treatments.   

ASBL - Assembled
DBL - Doublet
TPL - Triple

Picture
Products made of multiple layers or combinations of manufactured and/or natural materials joined together. Opal Doublets or Triplets are a great example here. An opal doublet is made by taking a slice of opal and gluing it to a backing. The backing is usually black as it enhances the colours in the opal. A triplet takes it one step further, with a thinner slice of opal attached to a black backing, then covered with a clear quartz dome. The dome both protects and slightly magnifies the opal. Doublets and triplets are much less expensive and much more durable than solid opals, and you still have that fire for which opals are prized.

B - Bleaching

PictureChocolate Pearls
The use of chemical agents to lighten or remove a gemstone's colour. A very common example is the use of hydrogen peroxide to bleach pearls. Many of the so called “chocolate” pearls are often black pearls that have been bleached.

​C - Coating

PictureMystic Quartz
Surface treatments to improve appearance, provide colour or other special effects. Some gems may be “painted” with a colouring agent such as ink or metal oxides to enhance or even change the colour. Some softer materials such as coral or pearls may be coated with a colourless resin in an effort to improve their durability. A good example of a coated gemstone is the Mystic Quartz. This stone starts as a natural clear quartz which is cut and polished, then coated with an extremely thin titanium film. This gives it a brilliant and beautiful rainbow of colours with a kaleidoscope effect. Since this coating only affects the surface of the stone, it can be scratched or worn off in time.   

D - Dyeing

PictureNatural and Dyed Howlite
The introduction of colouring matter into a gemstone to give it new colour, intensify present colour or improve colour uniformity. The best example I can think of for this category is a stone called howlite. Natural howlite is white, but it is a very porous stone and it accepts colour very easily. One of the biggest fakes out there is dyed howlite being passed off as turquoise.

E - Enhanced

PictureOnyx Dolphin
Some gemstones are routinely enhanced but it's difficult or impractical to prove it definitively. Many dealers will just assume that the stone has been enhanced, and will use the “E” symbol if they don't know which enhancement was done. Basically, unless the stone can be guaranteed as natural, this is the way to go. This assumption protects both the buyer and the seller. If the stone is found to be positively enhanced at a later date, no one can claim that it wasn't stated at the time of purchase. One example of a stone that is routinely enhanced, is black onyx. Most examples of natural onyx show bands of white, brown, and black. Black onyx gems are usually dyed. If the seller isn't 100% positive that it hasn't been dyed, black onyx will be marked with the “E” symbol.  

F - Filling

Picture Amber Pendant
This involves filling surface fractures or cavities with hardened resin, glass or other colourless substance. I once had a piece of rough amber which I shaped and polished by hand. Unfortunately, there was a bubble just under the surface, and I broke through. Instead of grinding the amber down and reshaping, I opted to fill the bubble with resin and continue on. It worked, you can only see the resin filling if you look closely.

G - Gamma/Electron Irradiation
R - Neutron Irradiation (regulated by the NRC)

Some gems are exposed to an artificial sours of radiation to change its colour. The colour of topaz can be radically altered with this method, so that strong blue topaz is likely a product of irradiation. Strongly coloured green, pink and red diamonds are also likely to have been subjected to this treatment. Only an experienced gem-testing lab can tell for sure if it's a natural or treated.   
Picture
Irradiated Diamonds

H - Heating

PictureUV/Heat treated Amethyst
Just as it sounds, this entails heating the stone and is used to affect the colour and/or the clarity. A clouded amber submerged in hot oil will often clear, and this will frequently deepen the colour as well. Amethysts are often heated to remove the common brownish inclusions they sometimes have. In fact, heating certain types of amethyst will turn it into citrine!

IMIT - Imitation

Picture
This isn't actually a treatment, it's a substitution. This is a designation for man-made products, designed to imitate and resemble the appearance of a gemstone, but not duplicate the gems' characteristic properties. For example, coloured glass or crystal can be made to resemble rubies, sapphires and emeralds or plastic can be made to resemble pearls. They may look similar, but are obviously fake when examined.

L - Lasering

Picture
This is pretty much exclusively used for diamonds. The process includes using a laser to drill tiny holes in the diamond to access inclusions that detract from the gems' appearance. If the inclusion wasn't burned out by the laser, then it can be vaporized or bleached with chemicals.   

MM - Man-made

Picture
Pretty self explanatory, these are “gemstones” that are completely fabricated products. A good example is goldstone, which comes in blue, red, brown, green and other colours. Though called a stone, it's actually a glittering type of glass that has gone through a specialized process that allow copper crystals to be formed. Another example of a man-made “gemstone” is the product know as “cherry quartz”. Some have claimed it to be a natural stone, however it is only a coloured glass. 

N - Natural

PictureMalachite

​This symbol is reserved for stones that have not been enhanced or treated in any way. Thankfully, there is some natural beauty left in the world, and I try to go this route whenever possible.

I - Infilling
O - Oiling/Resin Infusion

PictureOil Infused Emerald
As far as I can tell, these are almost the same thing with one important exception. Both involve intentionally filling cavities or fractures that break the surface of the stone, in order to improve the appearance and durability of the stone. Infilling is done with hardened substances such as glass or plastic, and oiling is done with unhardened substances, such as oil. In the picture you can see the difference in the emerald before and after oil infusion.

S - Stabilization(Bonding)  

PictureStabilized Turquoise
This is the introduction of a bonding agent (usually plastic) into a porous stone. This is a very common treatment for turquoise because it is such a soft stone. The process increases the hardness of the stone which allows it to be cut or drilled more easily and with less damage.

SYN or CR - Synthetic/Created

Picture
This is a gemstone that has been created in a lab and is nearly identical to the natural version in appearance, chemical composition and optical properties. Interestingly, they often sparkle more brilliantly because they don't contain the impurities that plague their natural counterparts. Lab grown gems are becoming more popular as they are almost indistinguishable from those formed in the earth, except in price.

U - Diffusion

PictureStar Ruby

​Using certain chemicals alongside high temperatures can produce colours in some stones and also an effect called asterism (stars). Star sapphires or star rubies are good examples though they do occur naturally as well.  

W - Waxing

PictureRhodochrosite Globe

​The surface of a gemstone is covered in wax to improve the durability and appearance. It is not a permanent treatment, but it is easy enough to reapply the wax. Jadeite, turquoise, lapis lazuli and rhodochrosite are some examples of gems that are commonly waxed.

I'm sure there are other treatments that I haven't covered, and some that may differ in definition. Again there doesn't seem to be one standard set of symbols, they differ depending on who you ask and where you look. My suggestion; when in doubt, ask. Most dealers will list the codes that they use. Another good rule of thumb when looking to buy gems; if it seems too good to be true, it probably is. Until next time, happy creating and caveat emptor!
0 Comments

Gemstones for Beginners – Part 2

10/14/2015

0 Comments

 
Picture
One of the most popular style of gemstones in jewellery are faceted stones, especially diamonds. So let's take a look at this very specialized branch of lapidary. Faceting a stone means that the stone is cut with multiple flat polished surfaces at different angles. You can find beads and cabochons that are faceted, but for this post I'm going focus on the truly faceted stones, like the diamond. As I said in the last post, faceting is usually reserved for the higher quality transparent or translucent stones. The reason? The faceting process allows the light to be reflected through the stone and gives it that eye-catching sparkle.

Picture

​There are two basic types of facet cuts, trap or step cuts and triangular or kite cuts. With these two cuts, there are so many shapes that can be done, I won’t even try to assign a number.

These are some of the more common shapes:
Faceted gems have their own particular nomenclature:
Picture

Gemstone sizes
Beads are usually sized in millimetres or inches by diameter or length and width. Cabochons are usually sized in the same fashion. Faceted stones are different, they’re usually measured in carats. A carat is actually a unit of weight; one carat = 200 milligrams (0.007055 oz). Because different stones have different densities, a 1 carat diamond may be a different size than a 1 carat sapphire. Find that confusing? Me too. Which is why, when buying a faceted gem, I look for the actual measurement of the stone.   

Clarity of Transparent Gems
The clarity of a gem is directly related to its value. Inclusions in the gem (flaws), lower the value depending on how visible it may be. Many inclusions are not actually visible to the naked eye, but only to a skilled expert under magnification.   Diamonds are graded for clarity in a slightly different manner to coloured gems such as rubies, sapphires, etc.  There is no standard grading system for coloured gems, but these are the most common systems that I've seen.
Diamonds
This system is meant for white diamonds.  Coloured diamonds are not deemed to be as valuable as clear diamonds.  
FL
Flawless
Flawless under 10x magnification by a skilled grader.  Less than 1 in 5000 jewellery quality diamonds are given this rating.
IF
Internally Flawless
Internally flawless under 10x magnification by a skilled grader. FL and IF appear identical except to an expert. Less than 3% of jewellery quality diamonds are rated IF.
VVS1, VVS2
Very Very Slightly Included
Inclusions are extremely difficult to see under 10x magnification.
VS1, VS2 ​
Very Slightly Included
Inclusions are minor and only visible under 10x magnification.
SI1, SI2
Slightly Included
Inclusions are easily visible under 10x magnification but not usually noticeable to the naked eye.
I1, I2, I3
​Included
Inclusions are visible to the naked eye and may affect the transparency and brilliance of the gem.
Coloured Gems
Coloured gems often have inclusions, which is why they are graded differently than the diamonds.  I have seen the diamond scale used for other gems, but even then, it's used a little differently.  For many, the most important qualities of a coloured gemstone, is that it's eye clean (no flaws visible to the naked eye), and the colour is vivid and consistent.
Type 1
Inclusions are detectable only under 10x magnification.
Type 2
Eye clean.
Type 3
Inclusions are visible to the naked eye.

In my next post, I'll explain some of the treatments that gemstone are subjected to in order to enhance their appearance. Until then, happy creating!
0 Comments

Gemstones for Beginners

10/7/2015

0 Comments

 
PictureBismuth Crystal Cluster
I’ve posted a few entries now relating to metal and I’ll be posting many more! This time though, I’d like to take a little detour and talk about another integral part of jewellery making; gemstones and lapidary. This subject is just as extensive as that of metal, if not more so. Although you don’t need to be an expert in gemology to make jewellery, you should have a basic understanding. Believe me, it will come in handy when choosing your settings or cleaning your pieces. It will also give you an advantage when buying gems, as you may have an idea as to what’s legitimate and what’s a scam. Of course, if you’re like me, you’ll grow to appreciate the beauty of the many different kinds of stones and minerals. You’ll want to learn to cut and polish your own stones and maybe end up with a collection. My suggestion is to find out if there are any lapidary clubs in your area, and join up! That’s how I got started.

First things first, this post will give you a a basic rundown of some of the terminology you’ll run across, and an understanding of how stones are identified, graded and enhanced.


PictureCarved Jade Horses
Lapidary

If you haven’t already guessed, lapidary is the art of cutting gems and can also refer to the artist who cuts gems. Cabochons, beads, faceted or carved, it’s all lapidary work.


Mohs Scale of Hardness

Developed by German mineralogist Friedrich Mohs in the early 19th century, this scale rates the hardness of a stone or mineral from 1 (very soft) to 10 (very hard). The hardness of a sample is determined by finding the hardest material the sample can scratch or conversely, by finding the softest material that can scratch the sample. There are several reference points used; fingernail, Mohs 2.5, copper penny, Mohs 3, pocket knife, Mohs 5, glass, Mohs 5.5-6, steel file, Mohs 6.5 and diamond, Mohs 10. Also keep in mind that each classification can be scratched by the ones above it, or can scratch the one below it. So a Mohs 4 can be scratched by a Mohs 5-10 and can scratch a Mohs 1-3. Here’s a chart with some examples:
​
Mohs #
Common Object Test
Mineral
1
Can be scratched with a fingernail.
Picture
Talc
2
Can be scratched with a fingernail, but not easily.
Picture
Gypsum
3
Can be scratched with a copper penny.
Picture
Calcite
4
Can be scratched with a pocketknife. Will not scratch glass.
Picture
Fluorite
5
Can be scratched with a pocketknife, but not easily.
Picture
Apatite
6
Can be scratched with the edge of a steel file, but not with a pocketknife.
Picture
Amazonite
7
Scratches glass.
Picture
Citrine
8
Scratches quartz.
Picture
Topaz
9
Scratches all minerals but diamond.
Picture
Sapphire
10
Scratches all minerals. Can only be scratched with another diamond.
Picture
Diamond
Knowing the hardness of a stone helps determine what use the stone is best suited for, jewellery, carving, faceting, etc. Also bear in mind that softer stones are more suited for pendants or earrings. Stones in rings and bracelets are subjected to more wear and tear. Hardness may also affect which method you chose for cleaning or polishing your pieces.

Stones for jewellery come in different forms. Beads, tumbled stones, carved stones, cabochons and faceted stones are the most common.

PictureTiger Eye Bead


​Beads can be any shape or size but all have at least one hole drilled through for stringing.  

PictureTumbled Peridot
Tumbled stones are rocks of varying shapes and sizes that have been smoothed and polished in a tumbler. The rough stones are put in a tumbler barrel with water and a polishing grit and the barrel is placed on a machine that will rotate the barrel non stop. There are at least four grits, coarse, medium, fine and polish, and the stones are usually tumbled non stop for at least one week per grit. So that pretty pile of polished pebbles has taken a month to produce.

PictureCarved Amethyst

When you think of carved stone, most people think of statues and figurines. But there are also many talented artists carving on a smaller scale for jewellery. Cameos are an excellent example of carved stones, but definitely not the only kind.

PictureDendritic Agate Cabochon

​Cabochons come in a variety of shapes and sizes, and they are further classified by the dome height. Low dome, high dome, bullet and double dome.

PictureFaceted Prasiolite

​Faceting is usually reserved for the higher quality transparent or translucent stones, though I have seen a few opaque faceted gems. The facets are designed to reflect the light in such a way that enhances the gem. 


I'll go into more detail about faceted gems next post, as well as some of the ways gems are treated to enhance their appearance.   ​Until then, happy creating!
0 Comments

Essential Wire Working Techniques

9/29/2015

0 Comments

 
Picture

​Even those who don't do wire wrapping on a regular basis often find themselves working with wire in one way or another. Here are a few techniques that are common to many different types of jewellery making. These are all made with simple tools, pliers, hammers, mandrels and the like.   Building on these techniques, you'll be able to make many of your own connectors and findings, including clasps, ear wires, headpins and even chains!  


Making a Loop

Picture


With your round nose pliers grasp one end of the wire and rotate until the wire looks like a “P”.

Picture

​
​Centre the loop by turning your pliers until one tip is in the loop and the other is behind.

Picture


​​Rotate the pliers just a bit more until the loop is centred over the wire.


Wire Wrapped Loop

Picture

​
Grasp the wire about 12-25 mm (1/2 – 1”) from the end and make a loop (fig 4). 

Picture

​​
​Centre the loop. If you wish to insert anything into the loop, do it now as the next step will permanently close the loop. 

Picture

​​
​With a pair of chain nose pliers in your non dominant hand, grasp the loop just above where the wires cross.  

Picture
​
​With your fingers, or another pair of chain nose, wrap the short tail around the longer wire.  ​When you are satisfied with the number of wraps, cut off the excess and make sure the wrapped end is tucked in or filed down so it doesn’t catch on clothing.

Picture


​​Make a bead link by sliding a bead on the wire and making another wire wrapped loop on the other side of the bead.   


Hook

Picture
This will make a hook about 20 mm (3/4”) long.
Cut a piece of 18g wire about 50 mm (2”) in length. File the cut end of your wire smooth. Using your round nose pliers, turn a small loop on the filed end.  To make the curve for the hook, place a mandrel (anything round will do, a pen or sharpie for instance) about 6 mm (1/4”) down from the loop and wrap the wire around a mandrel until the wrapped end and wire are in close contact. 

Picture


​​Bend the tip of the wire out and file.  Hammer the hook gently to harden it.


"S" Clasp

Cut about 65 mm (2 1/2") of wire. (The length of your wire will be determined by how large you make your curves. Try making it in copper wire until you've got a clasp the size you want.)  Make small loops with the tips of your round nose pliers at each end of the wire. The circles should be flowing in opposite directions from each other.
Picture
​
​Grip one end with your round nose pliers. The little circle should be sitting up on top. 

Picture

​​Bend the wire around the pliers until the back of the little circle is touching the wire..

Picture
​Do the same with the other end, make sure the little circle is sitting on top.  You can hammer both of the large loops for a finished look and this will also harden the wire. Leave one end slightly open so that a jump ring can slide through.  


Toggle Clasp

There are two parts to a toggle clasp, the toggle ring and the bar. The ratio between the diameter of the toggle and the length of the bar is very important. The bar should be at least 1.5 times the diameter of the toggle. Anything less than that and the bar could easily slip out of the toggle and the piece will fall off. It also helps to have a loop, ball or other obstacle on the ends of the bar to prevent it from falling out.

Toggle Ring
Picture
​Start with a piece of wire about 15 cm (6”) long. Starting just a little off center, wrap the wire around a mandrel (a marker or highlighter will work well), crossing the wires at the top. One wire should be slightly longer than the other.

Picture


​​Bend the longer tail so that it points straight up. Wrap the shorter tail around the longer tail 4 or 5 times.

Picture

​When you're done wrapping, bend the longer tail off to one side about 45º, then make a loop. Cut off the excess wire and the toggle ring is done!

Bar
Picture
​Grip a 10 cm (4”) piece of wire at the centre point with your round nose pliers. Bend each side over the pliers until the wires cross at the top. Try to make sure the wires are the same length on each side. If they're a little off, just trim the excess. 

Picture
Make a small loop on each end of the bar. The bar should be at least 1.5 times the diameter of the toggle ring.

​If it's too short, start again with another piece of wire, a little longer than the first. If it's too long and won't fit through the ring, keep turning the end loops in toward the centre until it's the right length. Then trim off the excess. 


Jump Rings

​You'll see a lot of jump rings when you make jewellery.  You can buy them, but unless you're using large quantities, it's more economical to make your own.  
Picture
Wrap your wire around a mandrel of the size you want, then all you have to do is cut the rings off the coil.  You can use flush cutters, just be aware that even the best flush cutters may leave a small ridge that needs to be filed down.  The better option is to use a jeweller's saw to make flat cuts.

To open or close jump rings, use 2 pairs of pliers to twist them open or closed. Don't try to pull them open, this will just deform the ring.

So far I've concentrated on metal in jewellery making, and I'll have a lot more to say about it in the future!  Next time though, I thought we'd take a little side trip and start talking about another side of the process.  Stay tuned!
0 Comments

More About Wire Working!

8/13/2015

0 Comments

 
Picture
Wire is a very versatile medium to work in and there are a countless ways to use it. The wire wrapping technique I outlined last week was designed to give you a very basic idea of how to work with wire. That method can be changed and built upon, but there are other ways of wrapping wire that produce very different results. Not to mention a myriad of other techniques that yield complex and stunning designs. I can't claim to have mastered or even tried many of these methods, but that doesn't stop me from admiring the results and sharing them with you!


Picture
One of the more famous wire wrapping methods was developed by Preston Reuther. He is very well known in wire jewellery circles and his technique is unmistakable. The wire in his pieces seem to flow around the stones rather than having been shaped by human hands.  
Picture
You can also wrap wire using a jig. A jig is a tool that allows you to make the same shapes multiple times. The ones you can buy are usually squares of metal or plastic with a bunch of holes drilled in a grid pattern. They come with pegs of different sizes that you stick in the holes in whatever pattern you choose, then wrap wire around the pegs. I’ve seen a lot of jewellery made with a jig, with fancy loops and dangling beads. They are quite pretty, but I’ve always questioned just how stable some of them are. It looks like one good tug would undo the whole design, and if you’re anything like me, that one good tug is going to happen sooner or later!

Picture
I’ve also seen other pieces that don’t quite fit into the style I showed you, the style Mr. Reuther developed or the type of work done on a jig. Which means, don’t be afraid to try something new! Maybe you’ll develop a whole new technique and then you can teach it to the rest of us!

Wire Weaving

Just like threads are woven together to make cloth, so wire can be woven to make jewellery. I tried my hand at it and discovered it’s a lot harder than it looks! It requires much practice and much patience, but it can produce some awe inspiring results.
Picture
Picture
Picture

Knitting/Spool Knitting/Crocheting

Did you know that you can also knit and crochet with wire, just like yarn? You have to use a much thinner wire of course, but the basic principles are the same. Pieces made in this fashion I find are very delicate, but beautiful.
Picture
Picture
Picture

Picture
Viking Knit

Though called a knit, you don’t do this with knitting needles. This is more of a weaving process. Again beautiful, but very delicate and easily crushed if it’s too fine a wire and too large a diameter.

Chainmaille

It might be stretching it to consider this wire work, but I wanted to mention it here as well. Chainmaille is made with jump rings, which technically are made of wire. Plus I believe a basic understanding of wire working is very helpful when doing chainmaille. Especially if you want to make your own rings.  
Picture

Wire work is a staple in almost every kind of jewellery making. Even if it isn’t your main focus, or the main part of your pieces, it’s a good bet that wire is involved somewhere. Next week I'll show you some of the wire working techniques that I consider essential for jewellery makers.  Until then, happy creating!
0 Comments

Wire Wrapped Pendant

8/6/2015

0 Comments

 
Picture
Wire wrapping was how I got started in jewellery making. It's a great way to begin, you don't need a lot of tools or materials, so you're not spending a fortune. Plus, it's portable! You can take it with you on vacation, or just sit on the couch and watch TV while you wrap.

Just a quick word about wire before we start.

Wire comes in many different shapes; round, square, rectangular, half-round, triangular. Then of course there's bezel and gallery wire and patterned wire. So much wire! Not only does it come in different shapes, but of course, you can buy wire in different metals. For our purpose here though, I strongly recommend starting with ordinary round copper wire that you can find at the hardware store.

The size of your wire is pretty important, and there are a lot of different ways that the size is measured. It can get a little confusing. I'm sticking to AWG – American Wire Gauge in this post, you can find conversion charts online if you need it. The important thing to remember about wire size measured in gauge (ga), is that the smaller the gauge number, the larger the wire. So a 14 ga wire is much larger in diameter than a 20 ga wire.

Defintion
  • Temper – the degree of hardness and elasticity in metal

Wire can be purchased in different tempers, the most common are dead soft, half hard and full hard. Dead soft wire is very easy to bend and shape, but it does not hold it's shape when stressed, as in a clasp. Half-hard is still fairly easy to work and will maintain an intricate shape under moderate stress. Full-hard is much more difficult to shape, but it holds its shape once you get it done. Full hard is good for clasps. Wire will work harden, meaning that the more you bend or shape the wire, the harder it will get.  So dead soft wire will become full hard eventually.  If it is worked too much though, it will break.


Now, ready to get to work?  

Materials 

80 cm (30”)  20 ga wire
20 cm (8"0)  22-24 ga wire

I recommend copper wire, it's inexpensive and easy to find. And if you don't like how it's turning out, it's not as painful to scrap it and start over as it is with silver.   
Cabochon – minimum 18mm x 13 mm (¾” x ½”)

This technique will allow you to wrap stones of any shape and most sizes. For a beginner though, a cab is easier as it has a flat back and a uniform shape. The size I suggest is also based on what is easiest for someone new to wire wrapping.   

Tools

Wire cutters
Flat nose pliers
Round nose pliers
Chain nose pliers
Sharpie
Masking tape
Measuring tape
Pipe cleaner
File
Pocket knife – doesn't need to be sharp, but needs to be a smooth blade, no serrations

Making the Pendant

Picture
Measure the circumference of your cabochon by wrapping the pipe cleaner around it and then measuring the length of the pipe cleaner.  Add at least 90 mm (3 ½”)  to the measurement for the bail and any decorative elements you wish to add and cut wires to that measurement.. You should have enough wires to cover the side of the cabochon plus 2, one overlapping the front of the cab and one overlapping the back. 

Bundle the wires together, with all the wires even on the ends. Using masking tape, secure the bundle at each end and mark the middle of the bundle with the Sharpie.
Picture


Cut a 40 mm (1 ½”) length of the 24 ga wire. Using the tip of the flat nose pliers, make a 180° bend at one end about the same length as the width of your pliers. This is your wrap wire.   


Picture
Hook the wrap wire around the bundle just to one side of the center mark. Bend the wrap wire around the bundle and squeeze it tight with your flat nose pliers.  Make 4-5 complete wraps, squeezing each one tight. Cut off the excess wire. Make sure your cut ends are on one side of the bundle. This side will be placed against the cab so you won’t see the cuts.  Your wraps should be tight next to each other as in the picture.

Picture
With your pipe cleaner, measure the distance from the center bottom of the cab to the center side.   Mark this on your wire bundle, from the center of the wrap to the distance measured. Mark the same distance on the other side.  Make another wrap at each of these marks, just as you did the first one.
Picture
Place the center wrap at the bottom center point of the cab and gently bend the wires around the cab. The wraps should all be centered at the sides and bottom.
Continue bending the wires all the way around the stone; mark the spots on each end where they cross at the top center.    Remove the stone and set it aside for now.

Picture

Using your flat nose pliers, bend each end of the bundle straight up at these marks. Tape the ends together making sure you leave at least 20 mm (¾") space up from the wrap. The wire bundles should be lying right against each other.


Picture
Make another wrap wire just like the first ones, however, this time make your hook slightly larger by placing the wire further up the pliers.  Hook the wire around both bundles near the point where they have been bent upwards and make another wrap like the others.  Once the wires are wrapped together, remove the tape. Using your chain nose pliers, gently hold the piece at the wrap you’ve just done and with your pocket knife, separate the two bundles.

Picture


With your pocket knife, gently separate the wires in each quarter, only a little bit.


Picture

Decide which side will be the front of the pendant. With your chain nose pliers, gently grasp the front wire only, at the wrap and twist it inwards, about ¼ - ½ turn. Do this for the front wire only at each wrap. 


Place the cab in the setting, with the front dome of the cab pressing against the wires you just bent.  With your flat nose pliers twist the back wires in, just as you did the front wires.  The bends will be larger because the pliers are wider.  Once you have completed this step, your cabochon should be secure in its setting.

Picture

All that's left now is the bail! You should now have 6 wires sticking up at the top of your pendant. We're going to use two of these wires to make a simple bail. Choose two wires on the back of the pendant, one wire on either side of the bundle. 


Picture


Straighten those two wires so that they are standing almost straight up and down, the rest of the wires you can bend down out of the way.

Picture
Picture

Use your Sharpie, or a pen or pencil, as a mandrel to shape the bail. Place the mandrel on the back of the two bail wires and bend them around the mandrel.
Picture


Using your flat nose pliers, bend the wires straight down again where they cross themselves. Make sure you leave a little space between the bottom of the bail and the top of the cabochon.   


Picture


Cut a 50 mm (2” ) piece of 24 ga wire to use as a wrap wire. From the bottom of the loop, wrap the wires 5-6 times down toward the top of the cabochon.

Picture

The bail wires that extend from the bottom of the wrap need to be bent up using your chain nose pliers. This ensures they don't slip out of the wrap. You can either snip these wires short, or use them to add decoration to your pendant.  Make sure all your ends are filed so they won't catch on your clothing!


Picture


Use the extra wires to add decorative touches to your pendant.  
Let your imagination run wild! 

0 Comments
<<Previous
    Picture

    Author

    I've been making jewellery and other metal art for many years and  I thought I'd share some of the knowledge and techniques I have  learned.  As much experience as I've already gained, I know there's so much more to explore! 

    Archives

    April 2016
    February 2016
    December 2015
    October 2015
    September 2015
    August 2015
    July 2015

    Categories

    All
    General Knowledge
    Tools
    Tutorial

    RSS Feed

Powered by Create your own unique website with customizable templates.